[gard]
So after reading the White Papers, blogs and YouTube videos on the topic, I figured I would need notes for myself as much as anything. This is mostly because I am yet to find one single example that covered the setup I was after. That being:
Single Server
On an existing domain
Running true IFD ready for customer access.
The last point it telling, as all the Microsoft examples give a self generated SSL cert, that really is an example of a DEV environment only. We want to test the “real deal”, and don’t mind spending a few $ on a real Certificate to see this in a true working environment.
If you need support upgrading Microsoft CRM 4.0 to CRM 2011 or CRM 2013, then contact InteractiveWebs CRM team.
The Existing Setup
Because this is a test environment, we are running the server on a Hyper V server. A single VM machine, that is running a fully patched version of:
- Windows 2008 R2 SP1 64 Bit
- SQL 2008 R2 64 Bit
- Microsoft CRM 2011 64 Bit
Interesting enough, something that always takes me 15 min, it ensuring I download the correct version of the ISO files from MSDN. I get it that I am somewhat lame, but if you get a wrong version you can waste a load of time and energy later.
With a list looking like this it can be painful. Anyway, these are the files we used for install:
For those who care, the VM was set to run with 6000 MB ram, and fold out to use more.
Importantly
When we setup CRM, we selected the option to NOT use the default website, but configure a new one with the default settings of port 5555. This is necessary as you will see later.
Backup First
In all things Microsoft world, it is vital what you establish a working point to avoid unnecessarily installing things all over again. To get things working we have started fresh over 4 times.
Hyper V is great for this, as we just stopped the server, and made a copy of the VHD file. Then when it is time to start all over, it is just a matter of restoring from copy/backup.
Test First
Test that your CRM setup is working. Go to the local computer name (ours is VSERVER08) on the correct port: http://vserver08:5555
We called our Deployment of CRM – “CRM2011” So the URL redirects to: http://vserver08:5555/CRM2011/main.aspx
and after being prompted for login, we are in and testing.
Apply a Wildcard SSL Certificate
In CRM, the accessing of deployments is handled by the sub domains. So if we call a deployment “business1” we will access that as: https://business1.domain.com
For testing, we purchased a standard Wildcard SSL certificate that applied that to the IIS7 server.
We will let you work out that bundle of joy, but a few tips.
1. Godaddy was about as cheap as you find on the net.
2. Setup involves creating a certificate request from within IIS, then pasting that text into the online providers order system. They then generate the certificates that you then import back into IIS and the server.
3.
Application for a certificate
Here, I will be a wildcard certificate, for example, describes how to create a certificate:
1) Open IIS Manager
2) Click the server name in the main screen double click Server Certificates
3) In the right panel, click Create Certificate Request…
4) fill in the following diagram each column, click Next
5) Cryptographic Service Provider Properties page to keep the default, click Next.
6) In the File Name page, enter C: \ req.txt , and then click Finish.
7) Run cmd , run
certreq-submit -attrib “CertificateTemplate: WebServer” C: \ req.txt
8) Select the CA , click OK.
9) the certificate is stored as C: \ Wildcard.cer . ( 7-9 can also be in the CA to complete)
10) back to the IIS Manager, click No. 3) Step graph Complete Certificate Request …
11) Select the C: \ Wildcard.cer , Friendly name named *. contoso.com , of course, you can take a different name.
12) Click OK.
13) so that we completed the wildcard certificate request.
Additional SSL Certificate Imports
1) RUN MMC at the start / search
2) Select File / Add Remove Snapin – Select Certificates – ADD
Computer Account
3) Expand the first two folders, and Right Click on the Certificates Folder and select: All Tasks / Import.
4) Browse to your wildcard SSL certificate file, and import that into the Personal and Trusted Root Certification Authorities.
Ensure that you
Binding site for the default SSL certificate
1) Open IIS Manager.
2) In the Connections panel, expand Sites , click Default Web Site.
3) In the Actions pane, click Bindings.
4) In the Site Bindings dialog box, click Add.
5) Type select HTTPS.
6) SSL Certificate , select the certificate you just created *. contoso.com , and then click OK.
7) Click Close.
8) Repeat for the Personal certificate folder.
For the CRM 2011 binding site SSL certificate
1) Open IIS Manager.
2) In the Connections panel, expand Sites , click CRM Web Site.
3) In the Actions pane, click Bindings.
4) In the Site Bindings dialog box, click Add.
5) Type select HTTPS.
6) SSL Certificate , select the certificate you just created *. contoso.com .
7) Port to select a different 443 (e.g. 444 ) and port number, and then click OK
8) Click Close.
DNS configuration
For MS CRM 2011 configuration Claims-based authentication, you need the DNS to add some records to make CRM 2011 for each breakpoint can be resolved correctly.
There are two ways you can achieve the desired result. But first lets understand the desired result.
- We make the assumption that your server is running at least one static IP address.
- Because this is Internet Facing, that IP needs to be accessible to the world.
- That same IP can be used for access to your server both internally on the matching we are playing with, and externally form anyone on the net.
Lets Get Basic
Start a Command Prompt, and work out what your IP address of the server is.
Click START > RUN > CMD
Type IPCONFIG – Enter
Under the name: IPv4 Address is a number that looks like: 66.34.204.220
That is Your IP Address of the Server.
The DNS Goal
Make sure that when you PING xxx.domain.com that it points to that IP address. Both for the world and for you when you do that on your server.
(xxx is the sub domain that we are about to configure.)
To configure CRM, we need some sub domains to point to the server IP.
- sts.domain.com
- auth.domain.com
- dev.domain.com
- Your ORG name. org.domain.com (Where ORG is the CRM deployment name of your organization or organizations), e.g.

We have two setup here: CRM and CRM2011. So we need to configure crm.interactivewebs.com and crm2011.interactivewebs.com.
Hosting Your Own DNS
If you host your own Domain Name Server (DNS) and you host the domain name that you are using to setup IFD. Then configuring an A record for the above mentioned sub domains is easy.
START > Administrative Tools > DNS
Find your Domain Name
Right Click and select NEW HOST A
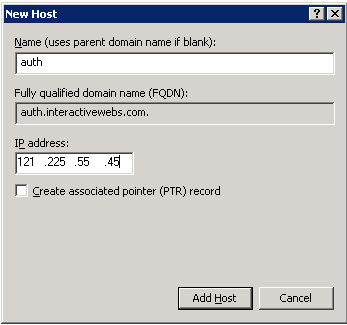
Add an A record that points to your servers IP address.
Repeat this process for all of the above mentioned sub domains. auth, sts1, dev, and your own organization names.
Test DNS
You must be able to ping all of those names and get the correct server IP address. Both from computers on the internet, and from the server.
Note: If you have added the DNS records, but still encounter name resolution problems, you can try running on the client ipconfig / flushdns to clean up the cache. You can also click the DNS server root and click CLEAR CACHE so that the server is responding with the latest updates.
Note: Don’t bother proceeding past this step if you cannot ping your sub domains internally and externally correctly.
Firewall configuration
You need to set the firewall to allow the CRM 2011 and the AD FS 2.0 port used by the incoming data stream. HTTPS (SSL) is the default port 443.
For Initial setup testing etc. We recommend just turning the thing off. Better start from a place where it does not muck you around, then turn it all back on after you are successful.
Configuration Claim-based authentication –internal access
Configure the internal access Claim-based authentication requires the following steps:
- Install and configure AD FS 2.0 .
- Set Claims-based authentication configuration CRM 2011 server.
- Set the Claims-based authentication configuration AD FS 2.0 server.
- Test claims-based authentication within the access.
Install and configure AD FS 2.0
CRM 2011 with a variety of STS provider ( STS Provider ) together. This article uses Active Directory Federation Services (AD FS) 2.0 to provide a security token service (security token service ).
Note: AD FS 2.0 will be installed to the default site, so install AD FS 2.0 , you must have CRM 2011 installation in the new site. (Remember we said that earlier)
IIS Looks like this if it is correctly installed: 
If you only see the default website with CRM installed in that. Start AGAIN!
Download the AD FS 2.0
From the following link to download the AD FS 2.0
Active Directory Federation Services 2.0 RTW.
Install AD FS 2.0
In the installation wizard, select the federation server role installed, for more information refer to
Install the AD FS 2.0 Software Configure AD FS 2.0
1 in the AD FS 2.0 server, click Start , then click AD FS 2.0 Management .
2 In the AD FS 2.0 Management page , click AD FS 2.0 Federation Server Configuration Wizard .
3 In the Welcome page , select Create a new Federation Service , and then click Next.
4 In the Select Deployment Type page , select Stand-alone Federation Server , and then click Next.
5 Choose your SSL certificate (the choice of a certificate created *. contoso.com ) ,add a Federation Service name ( for example , sts1.contoso.com), and then click Next.
Note: Only you as the AD FS 2.0 sites when using the wildcard certificate, only need to add the Federation Service name.
6 Summary page, click Next.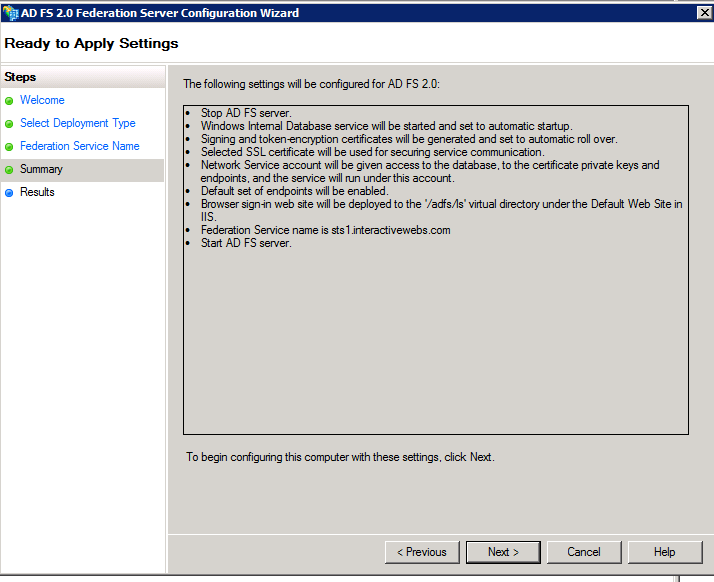
7 Click Close to close the AD FS 2.0 Configuration Wizard.
Note: If you have not added ( sts1.contoso.com ) to add DNS records, then do it now.
Verify the AD FS 2.0 is working
Follow the steps below to verify that the AD FS 2.0 is working :
1 Open Internet Explorer.
2 Enter the federation metadata of the URL , for example:
https://sts1.contoso.com/federationmetadata/2007-06/federationmetadata.xml
3. to ensure that no certificate associated with the warning appears.
Claims-based authentication configuration CRM 2011server
After you install and configure the AD FS 2.0 , we need to configure the Claims-based authentication before setting CRM 2011 binding types ( Binding type ) and the root domain (root Domains) .
According to the following steps to set up CRM 2011 bound for the HTTPS and configure the root domain address :
1 Open the CRM Deployment Manager.
2 In the Actions pane , click Properties .
3 Click the Web Address page .
4 In the Binding Type , select HTTPS .
5. Ensure that the network address for the binding CRM 2011 site SSL certificate and SSL ports. Because you configured for internal access to Claims-based authentication, so the address of the host for the root domain name. Port number must IIS in CRM 2011 is set in the port the same site.
6 For example, *. contoso.com wildcard certificate, you can useinternalcrm.contoso.com: 444 as the network address.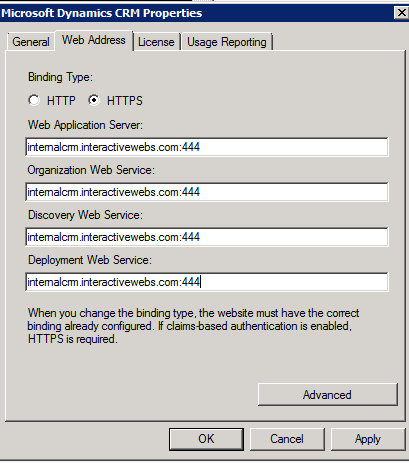
7 Click OK .
Note: If the CRM Outlook client configuration using the old binding value, then the need to be updated to use the new value. + Make sure you have a DNS entry for: internalcrm.
From the CRM 2011 is passed to the AD FS 2.0 of Claims data you need to use the Claims-Based Authentication Configuration Wizard (described below) specified in the certificate for encryption. Therefore, CRM Web application CRMAppPool account must have read the certificate’s private key encryption ( Read ) permissions.According to the following steps to give this permission:
1 in CRM 2011 server , run the Microsoft Management Console (Start => Run MMC).
2 Click Files => Add / Remove Snap-in …
3 left panel, select Certificates , click Add to add to the right panel.
4 In the pop-up window, select Computer account .
5 next page, select Local Computer , click Finish .
6 Click OK .
7 Expand the Certificates ( Local Computer ) => Personal, select Certificates .
8. In the middle panel, right-click you will be in the Claims-Based Authentication Configuration Wizard to specify the encryption certificate (in this case *. contoso.com ), click All Tasks => Manage Private Keys.
9 Click Add , add CRMAppPool account (if you are using Network Service , select the account directly), and then give Read permissions.
Note: You can use IIS Manager to view CRMAppPool what account to use. In the Connections panel , click Application Pools , and then see CRMAppPool under Identity .
10 Click OK .
Configure Claims-Based Authentication
Below, we setup Claims-Based Authentication Configuration Wizard ( Configure Claims-Based Authentication Wizard ) to configure the Claims-Based Authentication. To learn how PowerShell to configure Claims-Based Authentication, refer to the English original.
1) Open the Deployment Manager.
2) on the left navigation panel, right-click Microsoft Dynamics CRM , and then click Configure Claims-Based Authentication.
3) click Next.
4) In the Specify the security token service page , enter the Federation metadata URL, such as
https://sts1.interactivewebs.com/federationmetadata/2007-06/federationmetadata.xml
Note: The data is usually in the AD FS 2.0 website. Can this URL copied into IE to seeFederation metadata , to ensure that this is the correct URL . Using IE to access the URL can not have a certificate-related warnings (Ignore that crap!)
5) Click Next .
6) In the Specify the encryption certificate page , click on Select…
7) select a certificate, where we choose *.interactivewebs.com.
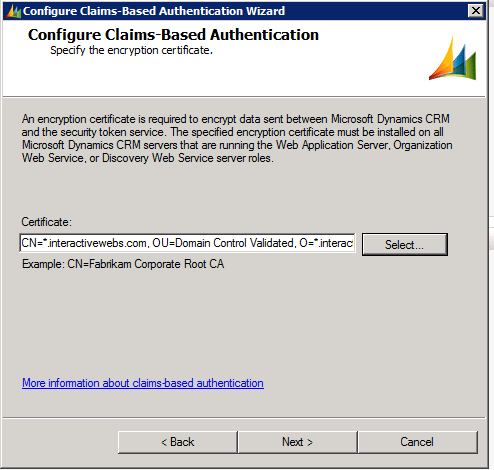
8) This certificate is used to encrypt the transmitted AD FS 2.0 authentication security token service security token.
Note: Microsoft Dynamics CRM service account must have the private key encryption certificate Read permission.
10 Click Next . Claims-Based Authentication Configuration Wizard validates the token and certificate you specified.
11 In the System Checks page, if the test passed, click Next .
12 In the Review your selections and then click Apply page , just to confirm the input, and then click Apply .
13. On this page, note which of the URL , because then, you will use this URL to add a trusted party ( Relying Party ) to the security token service.

14 IMPORTANT – Click View Log File
15 Scroll to the end, and Copy the URL from the bottom of the file.
16 Click Finish.
17 Validate that you can browse to the URL above. If you cannot view this in a browser, then have a look again at your permissions on the certificate in relation to the account on the application pool in IIS for CRM. Read above: Claims-based authentication configuration CRM 2011server.
18. Once you can browse this URL, you are done here.
Claims-based authentication configuration AD FS 2.0server
After completion of the previous step, the next step we need AD FS 2.0 to add and configure the statement provider trust ( claims Provider trusts ) and the relying party trust ( Relying Party trusts ).
Configure claims provider trusts
You need to add a claims rule come from Active Directory to obtain user ‘s UPN (user principal name) and then as a UPN delivered to MS CRM . Follow these steps to configure the AD FS 2.0 to UPN LDAP attribute as a claim is sent to the relying party ( Relying Party ):
1 installed in the AD FS 2.0 on the server , open AD FS 2.0 Management.
2 In the Navigation Pane , expand the Trust Relationships , and then click the Claims Provider Trusts.
3 In the Claims Provider Trusts under , right-click Active Directory , and then click Edit Claims Rules.
4 in the Rules Editor , click Add Rule.
5. In Claim rule template list , select the Send LDAP Attributes as Claims template ,and then click Next.
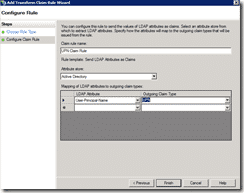
6 Create the following rule:
- Claim rule name: UPN Claim Rule ( or other descriptive name )
· Add the following mapping:
- Attribute Store: Active Directory
- LDAP Attribute: User Principal Name
- Outgoing Claim Type: UPN
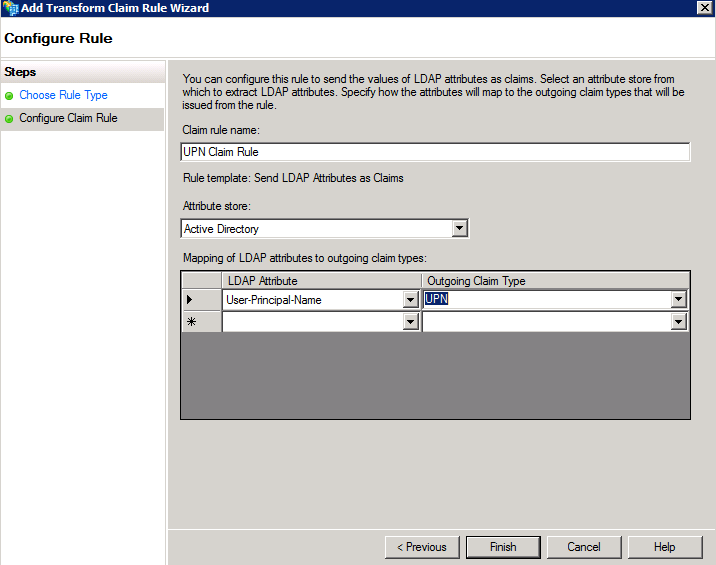
7 Click Finish , then click OK close the Rules Editor.
Configuration relying party trusts
In the open claims-based authentication, you must ensure CRM 2011 server configured as a relying party to use from the AD FS 2.0 statement to internal access claims certification.
1 Open AD FS 2.0 Management.
2 In the Actions menu, click Add Relying Party Trust.
3 In the Add Relying Party Trust Wizard , click Start.
4 In the Select Data Source page , click Import Data about the Relying Party Online or published on a local Network , enter the positioning federation metadata.xml file URL.
Federation metadata is set Claims when created. Use Claims-Based Authentication Configuration Wizard. The URL used here is IMPORTANT – Read point 14 in the above section. It is the URL retrieved from the VIEW LOG FILE That we did when from configuration of Claims Based Authentication: In this case
https://internalcrm.interactivewebs.com:444/FederationMetadata/2007-06/FederationMetadata.xml
Note: Ensure that no certificate-related warnings appear when hitting the URL.
5 Click Next .
6 In the Specify Display Name page , enter a display name, such as CRM Claims Relying Party , and then click Next.
7 In the Choose Issuance Authorization Rules page , choose Permit All users to access this Relying Party , and then click Next.
8 In the Ready to Add Trust page , click Next , then click Close .
9. When the Rule Editor appears , click Add Rule . Otherwise , the Relying Party Trusts list , right-click you create a relying party objects, click the Edit Claims Rules , and then click Add Rule.
10. In Claim rule template list , select the Pass Through or Filter an Incoming Claim template, and then click Next.
11 create the following rule:
· Claim rule name: Pass Through UPN ( or other descriptive name )
· Add the following mapping:
- Incoming claim type: UPN
- Pass through All claim values

12 Click Finish .
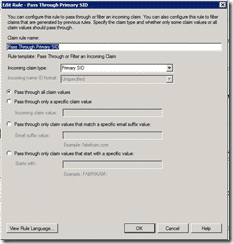
13 In the Rule Editor , click Add Rule , in Claim rule template list , select the Pass Through or Filter an Incoming Claim template , and then click Next :
· Claim rule name: Pass Through Primary SID ( or other descriptive name )
· Add the following mapping:
- Incoming claim type: Primary SID
- Pass through All claim values

14 Click Finish .
15 In the Rule Editor , click Add Rule
16. In Claim rule template list , select the Transform an Incoming Claim template , and then click Next.
17 create the following rule:
· Claim rule name: Transform Windows Account Name to Name ( or other descriptive name )
- Incoming claim type: Windows account name
- Outgoing claim type: Name
- Pass through All claim values

18 Click Finish , to create a good three rule later , click OK close the Rule Editor
Test claims-based authentication within the access
You should now be able to use the claims certified to the internal access CRM 2011 a
1 Open the Deployment Manager.
2 Expand the Deployment Manager node , and then click on Organizations .
3 Right-click your organization , and then click Browse . so you can open the CRM web page of ( for example: https://internalcrm.contoso.com:444 ).
Trouble Shooting
If the CRM web page can not be displayed, then run the following iisreset and then try again.
If the CRM web page still does not show, then you may need to setup AD FS 2.0 server setup a SPN (Service Principal Name) . Re-run the Claims-Based Authentication Wizard, and then browse to the Specify the security token service page, note the AD FS 2.0 server in the Federation metadata URL in the name. (In this case sts1.interactivewebs.com )

1 Open a command line tool .
2 Enter the following command : ( application, in your own environment, substitute the name of the name of the command line )
c: \> setspn -a http/sts1.interactivewebs.com fserver4\VSERVER08$
fserver4\VSERVER08 = the domain and machine name of the server.
c: \> iisreset
3 and then re-access the Microsoft Dynamics CRM Server 2011 site, so you should be able to successfully access to the CRM 2011 Web page.
http://technet.microsoft.com/en-us/library/gg188614.aspx
If you receive ADFS – sts1 errors.
There was a problem accessing the site. Try to browse to the site again.
If the problem persists, contact the administrator of this site and provide the reference number to identify the problem.
Reference number: xxx
And or if you look in your log files under ADFS 2.0 You will see errors like this.
In our case, this was because we used the external Metadata URL and not the Internal URL that we should have copied from the “View Log File” When configuring the Claims Based Authentication. Step 14 in the section above.

Note the difference between this:
https://internalcrm.interactivewebs.com:444/FederationMetadata/2007-06/FederationMetadata.xml
and the original meta data check we did with:
https://sts1.interactivewebs.com/federationmetadata/2007-06/federationmetadata.xml
We incorrectly figured it would be pulling the same XML data. It does NOT!
Configuration Claim-based authentication –external access
Open to the CRM 2011 Data Claims-based authentication of external access, you need to do the following steps:
1 complete contents of the previous section: Configuring Claim-based authentication- internal access.
2 for the IFD configuration CRM 2011 server.
3 for the IFD configuration AD FS 2.0 server.
4 Test claims-based authentication external access.
The IFD configuration CRM 2011 server
When opening Claims certified internal access, you can open by IFD external claims visited. The following describes using the IFD Configuration Wizard to configure, if you want to learn how to use PowerShell to be configured, refer to the English original.
1 Open the Deployment Manager.
2 In the tree structure , right-click Microsoft Dynamics CRM , and then click Configure Internet-Facing Deployment.
3 Click Next.
4 Fill in the correct domain information for the Web Application, Org, and Discovery Web services. Remembering here that in our case: *.interactivewebs.com was the name of the wildcard certificate used, and that PORT 444 was the port we configured for the CRM Web Instance in the bindings for IIS.
Thus we use:
- Web Application Server Domain: interactivewebs.com:444
- Organization Web Service Domain: interactivewebs.com:444
- Web Service Discovery Domain: dev.interactivewebs.com:444


Note – Enter the domain name, rather than the server name .
- If the CRM installed on the same server or servers are installed in the same domain, then the Web Application Server Domain and Organization Web Service Domain should be the same .
- Web Service Discovery Domain must be a Web Application Server Domain as a subdomain like the “dev.” that we setup in DNS earlier.
- domain name must be on the SSL certificate name
Domain examples :
- Web Application Server Domain: contoso.com: 444
- Organization Web Service Domain: contoso.com: 444
- Web Service Discovery Domain: dev.contoso.com: 444
5 In the Enter the external domain where your Internet-facing servers are located input box , enter for your internet to CRM 2011 server located outside the domain of information, and then click Next .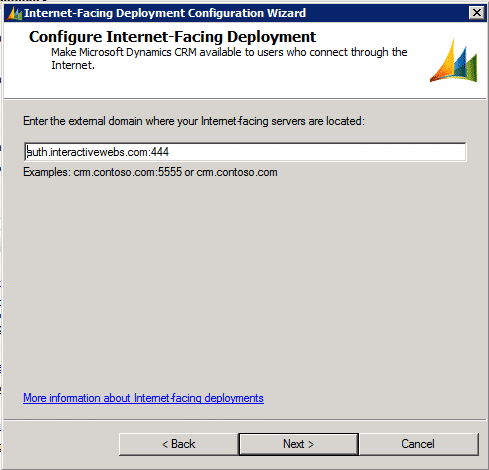
You must specify the domain specified in the previous step Web Application Server Domain sub-domains . default , will be “auth.” added to the Web Application Server Domain before.
Domain examples :
- External Domain: auth.contoso.com: 444
6 In the System Checks page , if there is no problem, click Next.
7 In Review your selections and then click Apply page , confirm your input , and then click Apply.
8 Click Finish .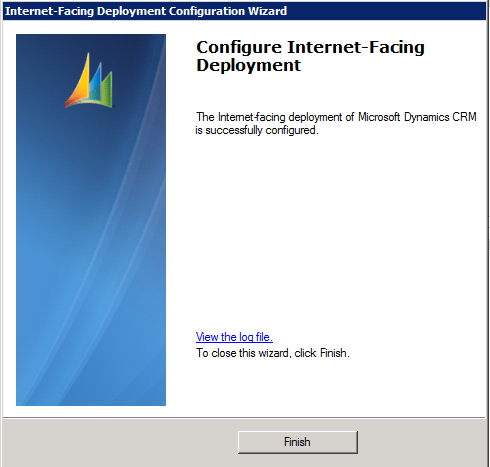
9. Open a command line tool, run: iisreset
The IFD configuration AD FS 2.0 server
To open CRM 2011 on the IFD , you need to add AD FS 2.0 server for the IFD to create a relying party endpoints. Follow these steps:
1 open AD FS 2.0 Management .
2 In the Actions menu, click Add Relying Party Trust.
3 In the Add Relying Party Trust Wizard , click Start .
4 In the Select Data Source page , click Import Data about the Relying Party Online or published on a local Network , enter the positioning federation metadata.xml file URL.
Note – This is almost the same URL as we used previously, but has the .auth sub domain that we used in point 4 above. For use the Federation metadata is configured IFD when created. In this case https://auth.interactivewebs.com:444/FederationMetadata/2007-06/FederationMetadata.xml .
Check in your browser the URL, to ensure that no certificate-related warnings appear.
5 Click Next.
6 In the Specify Display Name page , enter the display name , such as CRM IFD Relying Party , and then click Next.
7 In the Choose Issuance Authorization Rules page , select the Permit all users to access this relying party options , and then click Next.
8 In the Ready to Add Trust page , click Next , then click Close .
9. If the Rule Editor appears , click Add Rule. Otherwise , the Relying Party Trusts list ,right-click you create a relying party objects, click the Edit Claims Rules, and then click Add Rule.
10. In Claim rule template list , select the Pass Through or Filter an Incoming Claim template, and then click Next.
11 create the following rule:
· Claim rule name: Pass Through UPN ( or other descriptive name )
· Add the following mapping:
- Incoming claim type: UPN
- Pass through All claim values


12 Click Finish .
13 In the Rule Editor , click Add Rule , in Claim rule template list , select the Pass Through or Filter an Incoming Claim template , and then click Next :
· Claim rule name: Pass Through Primary SID ( or other descriptive name )
· Add the following mapping:
- Incoming claim type: Primary SID
- Pass through All claim values

14 Click Finish .
15 in the Rules Editor , click Add Rule ,
16. In Claim rule template list , select the Transform an Incoming Claim template , and then click Next .
17 create the following rule:
· Claim rule name: Transform Windows Account Name to Name ( or other descriptive name )
- Incoming claim type: Windows account name
- Outgoing claim type: Name
- Pass through All claim values
18 Click Finish , you have created three rule later , cl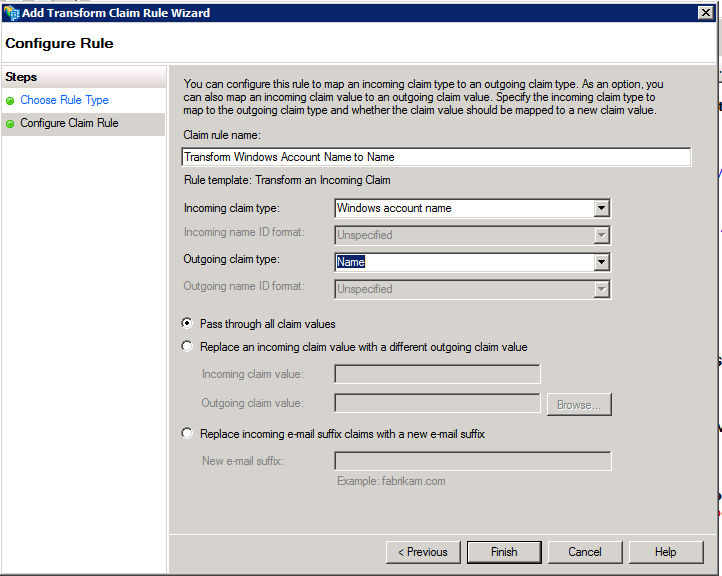
Test claims-based authentication to access external
Now, you should use the claims certified external access CRM 2011 a. In IE the browser CRM 2011 external address (for example: https://org.contoso.com:444 ), you will see the following pages:
Enter the user name password, log CRM 2011.
Final Notes
Like anything Microsoft, this was not easy. It took us over 10 attempts drawing on over a dozen resources to get this worked out. For us, the main tripping points related the the meta data URL’s used in configuring the endpoints. Our fault, but it also appears to be a common error to other administrators on the net.
To Microsoft – you documentation sucks badly! If I never read another White Paper it will be too soon!
Thanks to – Jackie Chen (Chen Pan) Your blog was GOLD!
good write-up, thanks for sharing!
No problem.. still testing and still working other bugs out.
Pingback: InteractiveWebs Blog » CRM 2011 IFD Multi-Tenency Migration Tips
Great, thanks! Do you plan to add SharePoint IFD instructions?
We likely will at some time, although we are not rushing into the connection with CRM and Sharepoint. Mostly due the the fact that historically Sharepoint has really let us down in this integration suite. It’s not a web portal, it’s not a great web data store (or not as good as custom S3 solutions). So we ended up building out our own Web portal, integration with DotNetNuke. http://www.interactivewebs.com/crm/InteractiveWebsCRM.aspx
Bottom line… I know we will have to setup a Sharepoint in the next month or two, so you will probably see it appear then.
Hi, I’ve a question at that point:
I’ve created new DNS, called
“The new DNS records, of which type they are? New Host, new alias, etc there are several types… thanks
”
…In the forward lookup zone created after the domain name to create the following DNS records:
· AD FS 2.0 server ( for example: sts1.contoso.com)
* external IFD access address – Microsoft Dynamics CRM IFD Federation Endpoint (for
…”
The outcome is that you need to be able to ping:
sts1.domain.com
dev.domain.com
auth.domain.com
yourorg.domain.com
(See the updated DNS Notes – domain.com being your chosen domain name.) If you domain name is hosted some place, and has a DNS management tool, you can just configure these (A) records there. If you have not setup DNS servers to manage your own domain, for internal and external hosting, you may well need some assistance with that from someone who understands DNS management. (We can do that at a charge if you are desperate use our contact us form on http://www.interactivewebs.com)
Make sure though that the outcomes as per the article are achieved before trying to move on.
Can you add perhaps a screenshot for the DNS configuration? Thanks.
I have updated the article to better cover the outcome requirements of DNS configuration.
Pingback: InteractiveWebs Blog » CRM 2011 Email Router Problems–She’s a Fickle Bitch
I’m at the step 14 of “Claims-based authentication configuration CRM 2011server”
The final form with the click possibility on log file doesn’t appear, the snap in crashes:
Type is not resolved for member ‘Microsoft.Crm.CrmException,Microsoft.Crm, Version=5.0.0.0, Culture=neutral, PublicKeyToken=31bf3856ad364e35’.
at Microsoft.ManagementConsole.Internal.IMessageClient.ProcessRequest(Request request)
at Microsoft.ManagementConsole.Executive.RequestStatus.BeginRequest(IMessageClient messageClient, RequestInfo requestInfo)
at Microsoft.ManagementConsole.Executive.SnapInRequestOperation.ProcessRequest()
at Microsoft.ManagementConsole.Executive.Operation.OnThreadTransfer(SimpleOperationCallback callback)
Anyhow, it seems that Claims-based authentication configuration was setup, because I’ve now a disable menu item. Someone else had this problem?
PS: Thanks for the DNS Update!!!
OK, with this hack I came to an successful end at the step 14: (Post from http://social.microsoft.com/Forums/en-ZA/crm/thread/8303ebad-34dc-4268-af82-69fb92141c27)
ALTER TABLE Certificates ALTER COLUMN Name NVARCHAR(256);
UPDATE
MSCRM_CONFIG.dbo.ConfigurationMetadata
SET
ConfigurationMetadataXml =
REPLACE(
CAST(ConfigurationMetadataXml AS NVARCHAR(MAX)),
‘Name of the Certificatenvarchar128’,
‘Name of the Certificatenvarchar256’
);
PS: I use RapidSSL Certificate
Brilliant guide thank you! Please check step 11 the incoming claim type states UPN however the image displays name.
11 create the following rule:
· Claim rule name: Pass Through UPN ( or other descriptive name )
· Add the following mapping:
Ø Incoming claim type: UPN
Dan Evans
Thanks Dan, I have updated that image now.
I stuck still now at AD FS 2.0:
URL https://sts1.contoso.com/federationmetadata/2007-06/federationmetadata.xml doesn’t show any XML, but wants to downoad the file. When I want to download, I get an error can not download.
https://internalcrm.:444/FederationMetadata/2007-06/FederationMetadata.xml works as expected. Any idea?
…
Verify the AD FS 2.0 is working
Follow the steps below to verify that the AD FS 2.0 is working :
1 Open Internet Explorer.
2 Enter the federation metadata of the URL , for example:
https://sts1.contoso.com/federationmetadata/2007-06/federationmetadata.xml
…
Could be just your browser on that one. Think that IE should display the XML without issue. Are you using IE, and if so, is there any error on the browser or in the server log files?
Guys: It works!! Thanks!!!!!!!!!!
Great post, was easy to follow but have a question. I have a SBS 2003 server and a CRM server that runs CRM 2011/ADFS 2.0, the SBS 2003 server already uses port 443 for OWA externally. I would like to use port 444 for ADFS
If I set the port 444 in the IIS default web site on the CRM server as the https binding, it does not resolve itself correctly. Instead of being reachable by “https://localhost”, you need to put in “https://localhost:445”. This screws up the ADFS/IFD installation later on.
I have successfully set up CRM/ADFS 2.0 on the CRM server before using port 443 and being able to access it externally by changing the https port in the router to the CRM server ip address. Of course this means OWA on the SBS 2003 server no longer works exernally.
Do you have any ideas? Thanks
You can have two port 443 certificates bound to the same default website, so long as you use a host header for the second bind. Then you can add host headers as needed to bind the subsequent addresses to the correct certificate.
In other words, I think you should be able to use port 443 and 444 as we said in the article, just doing host header defined instances for the ADFS. However we have not tested this.
hi,
on “Configuration relying party trusts”, you have specified a note like,
Note: Ensure that no certificate-related warnings appear when hitting the URL.
But i am getting this kind of warning, and in fact because of that only i am getting an error while trying to import federation metadata address on step #4 of “Configuration relying party trusts”
Secondly, I am using the self-signed certificate and following your steps. I hope it will do in that certificate too.
Awaiting your reply!
So Self Signed Certificates need to be added to the trusts.
IIS Needs to be restarted after doing that.
Sometimes a system reboot helps too.
hi,
thanks for the response. I would like to create the wildcard certificate, while running your below command , I am facing an error specifiying Ldap, the system cannot find the file specified.
certreq-submit -attrib “CertificateTemplate: WebServer” C: \ req.txt
I need to create the wildcard certificate because i am stuck on step #4 of “The IFD configuration AD FS 2.0 server”
In my case the auth URL is giving certificate warnning. Its really urgent!!
Hey I am not getting the alters for your responses here on this blog though i have specified my email address. If possible then could you please share your mail id or instat messenger ID from where you could help me out to resolve this issue. I am also having the Godaddy certificate too.
Hi,
I have a weird error here.
I have added the dns for auth.consoto.com and sts1.contoso.com
I can ping both of them from another PC.
But when i’m on the server, I can only ping auth.contoso.com. sts1.contoso.com doesn’t respond.
I can retreive the federationmetadata.xml from my other PC, but not from the server (So I can’t finish to configure the Claims-Based Authentification)
Any ideas about this error?
PS: Thank you for this tutorial it’s very useful
To Ankit > you typed it correctly? In the tutorial there is a misprint (there is a space between certreq and -submit) Like this
certreq -submit -attrib “CertificateTemplate: WebServer” C: \ req.txt
For me it worked fine with this.
Actually this is likely a DNS cache.
If you try to hit a sub-domain / URL – i.e. anyhting.domain.com and that does not have a valid record, the DNS server returns nothing.
Then when you create a DNS record, and ping it, DNS server says… Nup still got nothing. – Due to the fact that MS is not bright enough to update cache when you create records.
Solution
Reboot both CRM server and DNS Server.
or
Flush DNS cache / the run from CMD – “ipconfig /flushdns” on the CRM server.
I wish it had been that simple.
Actually I had some old parameters in C:\Windows\System32\drivers\etc\hosts
So now it’s fixed 😀 Thank you anyways,
hi,
On final step of ADFS 2.0 IFD configuration, i am getting an error like
“Error message: MSIS7612: Each party on relying trust must be unique across all relying party trusts in ADFS 2.0”
I don’t know why i am getting such error. Please help me out to resove this.
We found that the IFD with ADFS was really tricky to roll out. We found that we started over with the process about 10 times. (I just hate mucking deep with server side settings because I mucked up a process some place with install etc). That is exactly why I created the guide.
In any case, we did not encounter the same error, but I noticed that : http://social.microsoft.com/Forums/en-US/crm/thread/817804f6-6715-42fb-bec8-c43f472838a8/
this post has a few suggestions that may help.
Sorry we could not assist more.
Hi,
I have followed the guide step by step, but at step 14 of Configure claims based authentication, i view the log and test the URL for the federationmetadata. It returns a 503 error and says the service is unavailable. However, when i run the URL as:
https://internalcrm.contoso.com/FederationMetadata/2007-06/FederationMetadata.xml
(the only difference is that i have taken the :444 port out)
it runs perfectly fine, without certificate errors. Will this affect the steps in the guide later on if i use this URL instead of the one given in the log?
I have also looked at the permissions for the certificate which is set as ‘read’ for the CRMAppPool for identity NetworkService. Don’t know if i’m going wrong somewhere with these permissions?
Thanks for the help in advance.
Stuart
Hard to say, but that makes me think it is something in IIS.
Perhaps the website is stopped,
Perhaps the bindings has an error or is bound to the wrong IP address?
I would be looking for something in IIS that is stopping you hitting the correct URL through the setup you have.
I have browsed the web to see if there were any ideas or sollutions, and i have tried uninstalling the URLRewrite module and re-installing. I have also looked for errors using –
cmd : NETSH HTTP SHOW URLACL
None of this has helped. On anther note the URL page that i can run (without the :444 port) says : entityID=”http://sts1.contoso.com/adfs/services/trust” this is the same entityID as the sts.contoso.com/federation../..
Is this suppose to be the case?
Thanks
Actually I have not checked if they have the same ID. Sorry I cannot help more with this. But still I would be looking at IIS preventing you from hitting the correct URL (without :444)
hi,
Thanks for the reply. Can you clear some of my below queries?
1. Is HTTPS is requird for IFD?
2. Can I configure the IFD for CRM 2011 with windows authentication?
3. Can I configure the IFD without performing the Claim based authentication steps for internal access of above post?
1 Yes
2 No
2 No
ha… you sound like you want:
1. This to be easy.
2. You to decide how people access your site (crm, after all it is just a web site).
3. To save time and money.
Did you forget that 10 different companies working under the banner of Microsoft have all had a chef in the kitchen and a finger in the pie! It’s no wonder this is harder than it needs to be.
Installing ADFS/IFD is a real struggle. I will start from scratch again and follow your guide. One question, though. I want CRM on port 443 so the people accessing it don’t need to enter port numbers. That means ADFS needs to go on something like 444. So under step “Binding site for the default SSL certificate” can I just switch from 443 to 444 and the installation for ADFS will work fine? Or do I need to leave it at 443 and change it to 444 after the installation of ADFS?
And one more question as I am not familiar with SSL. Can I just create an ‘internal’ wildcard certificate first and once I decide to get the real one I just update the CRM and ADFS web site or would there be other steps involved?
The theory would be yes.
I have recently (through this blog) been put onto startssl.com. While it is a struggle to jump through all their hoops, it is in effect a free SSL service. So of price is the issue, I suggest you check them out.
Hi again,
I managed to fix my previous issue by getting in touch with MS support. The problem was that the self signed wildcard certificate that i created was not a domain certificate, and due to my set up this is what was needed.
My IFD is now correctly configured, however I cannot access CRM using the external URL from an external machine, is this related to the certificate being self-signed or should i still be able to use this certificate to access CRM externally?
Thanks
Hi,
Your indepth guide is by far the best ive seen whilst spending hours searching. Thanks for your efforts.
Would you be able to tell me if you’ve tried this setup in a hosted environment. So our network remains at our offices, but i want to host our dynamics installation at a data centre.
Is the only way to achieve this to have AD replicate to the hosted server and have the clients network and data centre server linked via vpn or can i use adfs2 to authenticate the users another way?
I would ideally like to have the dynamics installation pick up ad and exchange over the internet, rather than have the server onsite if that makes sense.
This setup blog, was setup on a hosted environment. Technically it does not make a lot of difference if your AD is in the same data center as your IFD / CRM. It is only going to add a little time at the initial validation point to the process. Once validated, your don’t keep talking to AD any more.
Pending firewall issues etc, it should work fine.
I have 2 servers :
1. AD + Exchange with IIS.
2. CRM2011 + SQL +SSRS with CRM installed on default website.
IDo I need to install everything (describe in you blog) , in the CRM server or I can install ADFS on the AD server ? what will be different on the procces in this case ?
You should be able to put the ADFS on either server.
That being said, it is probably only CRM and Sharepoint that will ever use it. This helped us decide to put it in the CRM server.
Pingback: InteractiveWebs Blog » CRM 2011 XRM Performance Problem IIS Dynamic Compression
Pingback: InteractiveWebs Blog » Your session in Microsoft Dynamics CRM is about to expire. CRM 2011 Extend Session Time
Thanks , by the end we changed the CRM site from Default ports to ports 85/444 , and every thing working fine.
Pingback: Microsoft CRM 2011 How to Configure IFD Hosted Setup -Kevin's Mocha
Thank you so much…this is awesome!
I still can’t believe how f*&$ing difficult Microsoft has made this. I half suspect they did this to push more people to CRM Online.
Thanks for the Kudos.
I still cannot believe there are so many people looking for assistance with this. We get 150 hits a day just on this topic.
Excellent Stuff!
I took down cheat sheets and screenshots to post something similar but never got around to it due to workload and lack of sleep!
I see that you accomplished my goal with the extra manpower and great documentation.
A great reference point for all, definitely the best on the web!
I eventually got my deployment done, but with many a late night and a PSS call!
One thing that may also help people is that they can update the metadatu url’s through the ADFS interface, this is where i got stuck!
My comments were the last on the MS Blog before yours which I went back to today to look for updates on the subject.
I have now been tasked to setup IFD for a multi-tenant CRM 2011 hosted solution – multiple customers into a IFD CRM 2011 server farm and guess what – no info available from MSFT!
The big question here is: Will there will be a single external url to access the IFD/ADFS site for ALL customers and based on the UPN they will get re-directed to the relevant CRM company Site?
Looking at how MS do the multi customer solution is not so inspiring. Depending on how large you are, it is really just best to pick the single domain reference point and work with that till load dictates you break it down into subdomains. At least that is what MS appear to have done, using sub domains for world regions and presumably data centres. Anyway, that is how we do it.
Awesome blog post. You have gone to a lot of effort and it is greatly appreciated.
I have luckily avoided having to set this up for a customer but if I do at least you have given me a bit of a head start
Thanks for the comments.
Just finished multi tennant solution;-)
Each CRM customer / Organisation just needs their own external DNS Record that matches their CRM Org name i.e: https://abc-org.hostedcrm.com!
Hello and thank you for this detailed overview.
I am a little confused in the beginning. In the section “Apply a Wildcard SSL Certificate” you start off writing “We will let you work out that bundle of joy, but a few tips.” Then go through the requestiing and applying of a certifcate.
1. Does this process require installation of both a personal ssl certificate and a public certificate? Which certificate should be installed in the Personal and Trusted Root Certification Authorities. The directions on GoDaddy site is to install the GD certificate into the Intermediate Certification Authorities section.
2. It seems like the process is to use an internal/personal certificate for internal facing and use the GoDaddy certificate for external/IFD? Is this correct? If that is the case, which certicates should be bound to the Default Web Site and the CRM Website?
Sorry, another question. I am at the step for “Test Claims-based authentication with the access. I cna browser to my site, however, I get a Windows login prompt. If I enter my userid/pw then CRM loads.
1. Is this correct? I would think that accessing the URL internally should check my credentials and pass a token without me needing to login via windows logon prompt.
I get no errors in event viewer.
2. I did have to run the setspn command to get it to work.
3. I actually don’t care about internal access, as all users will be outside the domain and accessing CRM externally. So do I need to fix this?
4. Any ideas on where I should look for problems?
“If you host your own Domain Name Server (DNS) and you host the domain name that you are using to setup IFD. Then configuring an A record for the above mentioned sub domains is easy.”
What if not? 🙂
Do I have to create a second DNS forward zone (besides mydom.local) for mydom.com? That would mean to “replicate” every HOST/CNAME currently existing in external DNS and keep both up to date.
The Claims Based Auth whitepaper does mention a “Subject Alternative Name” certificate. Would that kind of cert do the trick (and replacing any internalcrm.contoso.com with internalcrm.contoso.local)?
Thank you!
I’m kind of confused at that? The point of IFD is for it to be external facing, not an internal thing. For internal connections you can probably fudge it with the Windows HOST record, but you will not be able to get authenticated certificate on a domain name that is .local. That would need to be handled by a self signed cert.
Probably easier to register a domain for like $11 a year or less and use the services of the registration services to setup DNS services that are then going to fit into the model we have described.
Pingback: CRM 2011 – Articles, documents and videos on setting up IFD for Microsoft Dynamics CRM 2011 | Metaphorix
Pingback: CRM 2011 – Articles, documents and videos on setting up IFD for Microsoft Dynamics CRM 2011 « Hosk's Dynamic CRM 2011 Blog
This is the best article I’ve seen for IFD deployment and it helped me FINALLY get it working. Appreciate the good work!
No problemo.
Great article, first one I found that actually got me up and running in a few hours after spending weeks trying to figure this out.
Hi,
Thanks for providing such a detailed insight of the installing and configuration process!
I’m trying to configure “Claims-Based Authentication in Dynamics CRM 2011”.
During the system checks, CRM Deployment Manager throws the below error
“The federation metadata URL is not available”
I tried to access the federation metadata URL and was able to access the .xml file without any issue.
Kindly help me with a solution.
Thanks,
Kruba
You can get this is the URL is protected with an unsigned certificate. One way to test this is to go to another computer, and hit the URL, and check that the HTTPS path does not throw a certificate error.
Also, you should be sure that the post is specified in the path, so that the return is running on the correct port.
@InteractiveWebs
Thanks for your reply!
I tried to hit the URL from another computer; though I was able to access the .xml file, the browser threw a certificate error.
Can you kindly let me know, whether there are any free Certificate Issuing Authorities? And will the certificate error get resolved if I can get a certificate from them?
Thanks,
Kruba
Hi. Thanks for this good posting.
In addition I wonder if someone is used to do this behind a firewall with port mapping.
I have the problem, that 443 is already used on the external domain and we will have to come through a different port. This seems to be pretty straight forward, but what else has to be mapped form external point of view?
We map e.g. 40400 to 444 for crm like contoso.com, but then it seems that also the sts1 site will have to be reachable from outside. It provides the login page when I am right.
So I will need a mapping from 40401 to 443. Right?
But how to tell this the IFD configuration? So that it will use the external port 40401?
I hope you all got my point and can give me some hints.
Kind regards
Alex
Hi, Great article! But I am confuse, i have few question here.
1. How if I want to implement ADFS and CRM with seperate server for IFD? I’ve read Microsoft guide did mentioned the following.
“Note: Setting the port number to a port other than 443 is not needed if your AD FS server and your Microsoft Dynamics CRM Server 2011 are separate servers.”
2. Which IP should I point to if my ADFS and CRM are seperate server?
sts.domain.com > CRM or ADFS ???????
auth.domain.com > CRM or ADFS ????
dev.domain.com > CRM or ADFS
3. If i register a public cert. can i just register under *.domain.com ? Or sts, auth, dev each subdomain require dedicated certficate?
Sorry that I’m really noob with ADFS.. appreaciate someone can help me with a guide.. thanks in advanced!!!
1. Actually the ports don’t matter a whole lot, which is why they say “another port” Typically 444 is used, bur really the important thing is not 443.
2. sts = ADFS
auth=ADFS (from memory)
dev.= CRM
3. *.domain.com is ok, and I think we mentioned this in our post, but should be fine.
Don’t feel bad that Microsoft make this hard. It is a reflection on them not you! They like to build little clubs of acronym dropping “tossers” who have experienced pain before you have. They call these people server administrators… (alas I am in the club)
Pingback: Dynamics CRM 2011 : Claims and IFD | Laurent Bel's blogging
Hi
Great article and thank you.
I’ve one question, Is it possible to have one url htts://crm.domain.com and when user login CRM will redirect user to default organzation?
I don’t want to use org.domain.com as url if it is possible!
If you are suggesting this for a multi-tenant setup (more than one org) then I think the answer is no. If you would like to use a URL redirect for one instance to one org, then that could be done with an IIS redirect or a web page that redirects. Then end URL will be the crm.domain.com though.
Hi
Do you know if it is possible to have Claims auth only for external and IFD?
To Microsoft – you documentation sucks badly! If I never read another White Paper it will be too soon!
I am kind of new at this so I thought I was just having a hard time following along, but the more I learn and the more I read and the more products I learn to install and configure, like SharePoint and CRM, the more I think that there really isnt one single person who really knows how to install or configure any of these products. There are mistakes all through the code and the instructions…maybe they should make it all open source and let the people sort it all out..? That’s what ends up happening in the end anyway. When you read the instructions and nothing works, we all end up doing an internet search for a post like the one above from someone, or usually a combination of some extremely smart people who have cracked the mystery of how to install these products.
The good part is that once they are up and running, we have some of the best tools available. But the more I learn, the more worried I am getting that there is total confusion at the other end of all this code..?
Thanks alot for your post here. Every step worked perfectly!
Thanks for the Kudos. I totally agree with your comments. My BIG BIG suggestion is that for first time Administrators. Do it all on virtual machines, with restore points before each step. Don’t accept failure / hacks to make things work, but do it step by step getting it all correct. Basically the MS stuff will work way more reliably when you do this. I would have done around 10 complete start overs to get things all humming nicely.
Pingback: URL Rewriting for user-friendly URLs with Dynamics CRM 2011 « sides of march
Good post for CRM URL Rewriting.
Thanks for the extensive information,We followed all the above mentioned steps and we face the following two issues. Any valuable suggestions appreciated.
1. After IFD configuration , our outlook client still communicates to AD and this is not desired in IFD as web/adfs server is responsible for communication with AD. This looks to be an ugly issue 🙂
2.Internal URL is not accessible and only external URL is accessible. Any clues ?
Really hard to guess, but I would always suggest a step by step approach with testing at every stage.
Hi,
Thanks for the guide. I configured IFD right to the end , but when i try to acces the system, the following error i receive from AD FS 2.0 event viewer
The Federation Service encountered an error while processing the WS-Trust request.
Request type: http://schemas.xmlsoap.org/ws/2005/02/trust/RST/Issue
Additional Data
Exception details:
System.ArgumentException: ID4216: The ClaimType ‘Name’ must be of format ‘namespace’/’name’.
Parameter name: claimType
at Microsoft.IdentityModel.Threading.AsyncResult.End(IAsyncResult result)
at Microsoft.IdentityModel.Protocols.WSTrust.WSTrustServiceContract.ProcessCoreAsyncResult.End(IAsyncResult ar)
at Microsoft.IdentityModel.Protocols.WSTrust.WSTrustServiceContract.EndProcessCore(IAsyncResult ar, String requestAction, String responseAction, String trustNamespace)
Any ideas?
Thank You
There is a blog here talking about this: http://social.technet.microsoft.com/Forums/eu/winserverDS/thread/291a97a1-65f9-4125-9bd8-5071b29bd5ec
I setup IFD, thanks for the nice instruction. However now the sts keeps asking for username password. Do you know of any way to do a real single signon using Kerberos with IFD?
Apparently the latest version of STS supports single sign on with IFD, however we have not had the need yet to work all this out. Sorry. Google would be your friend here.
Hi,
I just finished configuring the relying party trusts rules and when I complete this section and try to test my user credentials fail (https://internalcrm._____ )I have followed the guide from start to finish twice now and have got stuck here both times.
I have retraced my steps but I am genuinely out of ideas why this isn’t working. I have tried logging on with different domain users who has CRM 2011 permissions but each time it is stating that – ‘you do not have permission to view this directory or page using the credentials that you supplied’ after the third logon attempt.
I am able to view the CRM site with the Deployment Admin account prior to this setting.
Any help would be very much appreciated… thanks 🙂
What error do you get with the failure. Look at logs etc to see why it is failing.
Guys, I am also getting the same error.. dont know where i am going wrong.. please help.. and also let me know where exactly i should look into trace..
Hi, I am having the same issue as Ankit –
I am on the last stage of the guide – The IFD configuration AD FS 2.0 server
> I enter the .auth subdomain
> Give it a display name
> Permit all users
> Click ‘Next’ to finish and I get the following error –
“MSIS7612: Each identifier for a relying party trust must be unique across all relaying party trusts in AD FS 2.0 configuration”
I notice under the ‘Identifiers’ tab on ‘Ready to Add Trust’ page that the display name = .auth subdomain and the ‘Relying party identifiers = https://internalcrm.______ – this doesn’t seem right…
I see Ankit posted on here but I don’t know if it was resolved –
http://social.technet.microsoft.com/Forums/en-US/winserverDS/thread/cbcf4a98-6f6d-420c-8e08-82b7752b6d54
Any help would be much appreciated 🙂
I ran into a similar issue when I was going through the IFD setup. You need to follow these steps precisely in this order….
1. Configure CRM For Claims-Based Authentication via Deployment Manager
2. Add Relying Party Trusts for the Internal URL only.
3. Confirm that you can access CRM via the internal URL
4. Configure CRM for Internet-Facing Deployment via Deployment Manager
5. Add Relying Party Trusts for the “auth” subdomain
If you don’t do step 4 before step 5, the FederationMetadata returned from the “auth” subdomain will contain the internal URL as an endpoint. This will cause the error you are getting because that endpoint already exists in ADFS associated when the Trusts added in step 2. You should be able to confirm this by putting “https://auth.[yourdomain].com:444/FederationMetadata/2007-06/FederationMetadata.xml” into your browser (The Endpoints are listed near the end of the XML). Once you have done step 4 and try to hit this URL again, you should see the endpoints for the “dev” and “auth” sub-domains plus a sub-domain for every organization you have configured in the Deployment Manager. Once you confirm that the endpoints are returning correctly in the metadata, you should be able to complete step 5 without getting the issue you mention.
We ran into an issue while trying to setup the ADFS to use a proxy for external access.
We used DNS to provide internal/external resolution of approrpiate DNS entries.
Internally all bidings for crm point to ourcrm.ourdomain.com
ADFS for claims authentication works great internally, with the internal dns pointing to adfs.ourdomain.com
Externally, we wanted to use an ADFS proxy server instead of directly accessing the ADFS server.
We setup external DNS to resolve adfs.ourdomain.com to the proxy server’s public IP address.
Directly browsing to the login page on that ADFS proxy provides the ADFS login forms page and authenticates correctly.
Trying to access the CRM publicly ourcrm.ourdomain.com with the proxy results in an error page. If we change the IP address resolution on the public side to allow the DNS for adfs.ourdomain.com to go directly to the primary ADFS server, it works fine, resulting in a desired login request and then redirecting to the CRM site.
I would have thought you are on the correct track. I would be looking at what error the proxy throws. Checking that authentication can work from the proxy to the server. Remember that in normal instances the internal address is domain.com/crm, and internal access would normally fail where yours works.
Hello,
Good article…much better than the white paper from MS.
How to handle the scenario where the CRM server has an internal ip and mapped with an external ip through firewall.
Thanks
Fantastic writeup.
Will this configuration allow users in the domain (and behind the firewall) to access the CRM via the CRM SDK? (i.e. via the .net Microsoft.CRM.SDKTypeProxy,CRMService assembly)?
Thanks in advance for your reply.
Yes, generally the XRM connectivity web services are just hung “some place” that is really unrelated to this authentication method. We typically throw it up on another IIS website instance on the same web server. Internal access and external access use the same method.
Hello,
Thanks for the blog post. It’s been a great help. I’ve got a quick issue, you might’ve seen it before.
I’ve got a 2011 IFD deployment all up and running, no problem. Out of nowhere (nothing has changed) when CRM redirects me to the ADFS login page, I get a “403 – You do not have permission to view this directory or page using the credentials you suplied”.
Any rough ideas on what this might be from? I’ve turned on Fiddler, but being HTTPS its a bit harder to follow the trail.
Thanks in advance,
John J.
It could be that you logged into another CRM instance, with another user name and pass. Either on a browser session or in outlook. The cookies get all confused and fail in the way you describe. Reboot client computer is easy fix, and have a look at: http://www.interactivewebs.com/blog/index.php/crm/crm-2011-server-error-404-file-or-directory-not-found/
Under “For the CRM 2011 binding site SSL certificate”
What does
“Port to select a different 443 (e.g. 444 ) and port number, and then click OK” mean?
Does this mean select port 443 or does it mean select port 444?
Thanks.
That is trying to say, use something other than 443. So 444 is acceptable as it is not 443.
Great blog for IFD
Great Blog!!
this is infact a very great steps of instructions for CBA_IFD.
i tired these steps but i failes to add a “Trusted Relying Party”.
I am getting the below error
An error occurred during an attempt to read the federation metadata. Verify that the specified URL or host name is a valid federation metadata endpoint.
——————————————————————————————————–
Verify your proxy server setting. For more information about how to verify your proxy server setting, see the AD FS 2.0 Troubleshooting Guide (http://go.microsoft.com/fwlink/?LinkId=182180).
Error message: The underlying connection was closed: Could not establish trust relationship for the SSL/TLS secure channel.
———————————————————————————————————-
my end point is working if put it browser and this i got from the log file while creating CBA. also i have tried for IFD one, that also did not work and i got the same error.
please help me in this.
i am almost done but the end point i am unable to register in the ADFS side.
“I am using the self signed certificate in IIS”.
thanks in advance.
yes.Sudhanshu
We actually encountered this error MSIS7612 after a year onsite and an automatic rollover of the ADFS certificate. On investigation we found a Microsoft Article:
http://support.microsoft.com/kb/2546710
however this turned out not to be the exact issue. What our issue was… we were not careful enough to leave out the HTTPS:// when configuring the web address properties in the CRM deployment manager.
Details here: http://www.interactivewebs.com/blog/index.php/server-tips/ad-fs-certificate-rollover-crm-2011/
In particular the configuration tab: http://www.interactivewebs.com/blog/wp-content/uploads/2011/07/image39.png shown here, should not start with HTTPS:// as you would expect, and I am guessing that this is your error too.
Hi, Can someone help me to configure IFD without a wildcard certificate?
I search a lot on blogs and google but I can’t find any documentation about this.
I have 5 certificates: adfs.mycompany.uk, auth.mycompany.uk, crm.mycompany.uk, dev.mycompany.uk and myorg.mycompany.uk
– adfs.mycompany.uk is used on Default Web Site on port 443 when I configure adfs
– crm.mycompany.uk is used on Microsoft Dynamics CRM on port 444 and is used for internal
The problem is that I cannot bind other certificates on port 444 on IIS
How can I bind the rest of the certificates on IIS on the same port?
How can I configure IFD for CRM 2011 with 5 certificates for Internal and External?
Please help me to solve this issue. Thanks
The only way to do this is with multiple IP addresses.
Brother, if you can, try to recreate your 5 certificates using just one with multiple subject alternative names. Its will solve your problem.
Hi,
Many thanks it’s a Great tutorial.
I have a problem when i try to configure Claims-based authentication configuration CRM 2011server .
Please refer to the two following links to preview the error.
http://imageshack.us/photo/my-images/341/error1r.jpg/
http://imageshack.us/photo/my-images/19/error2np.jpg/
Thx,
Looks like an issue with the server / snap in. First thing would be a reboot and ensure that service packs and updates are installed.
Thank you for you help, problem has been solved it was a problem whit the *certificate i used .
I have found the solution here http://social.microsoft.com/Forums/en-US/crmdeployment/thread/021150e3-dc22-4490-8a99-542c82fdbadf#0d44ab78-81d5-4231-95c2-cae06ca96598
I used another *certificate from godaddy.com it works fine.
Now i’m facing another problem :
after i finished IFD configuration the external link is working fine but when i tried to browse the internal one i got the following error :
404 – File or directory not found.
The resource you are looking for might have been removed, had its name changed, or is temporarily unavailable.
Any suggestions for this problem.
Pingback: Configure CRM 2011 and ADFS 2.0 on a single server on port 443 « Getting IT Right
Pingback: Event ID 17137 from source MSSQL$MICROSOFT##SSEE | InteractiveWebs Blog
Pingback: AD FS certificate rollover CRM 2011 | InteractiveWebs Blog
This is one of the first real step-by-step instructions of getting ADFS and IFD working for CRM 2011 that I have seen as of yet. We have som problems getting the legacy discovery web service to respond (the /MSCRMServices/2007/SPLA/CrmDiscoveryService.asmx). It just responds with a “401 not authorized”. Are you able to reach that service from the outside on your system? I’m currently going through all these steps to ensure our system is correctly set up.
We can reach it on our setup. There are a few people with the same problem as you I see: http://social.msdn.microsoft.com/Forums/is/Geneva/thread/124b4068-e5ac-4565-a3fa-a71fc13595df hope that helps.
Hi,
Thanks for the Clean screenshot display. Had some struggle in setup. But finally got setup done. Thanks again for sharing to all….. 🙂
Thanks
T.Vinoth
Thanks mate… glad you enjoyed it.
Hi, Having some issues here.
First of all this is a great post. I’m not sure where I’m stuck though. All metadata URLs are accessible, but when I navigate to the https://org1.domainname.com:444. I get a page not found. I saw your mention of this, and tried the suggestions but still no luck.
The only thing unique about this is I have a separate server for sts1. ADFS is installed on both machines.
This was working before, but then our certificates expired, well I renewed them, restarted the machines, and then I’m stuck.
If you are talking about ADFS Certificate Rollover.. Wow… what a complete bitch that is. But this article we wrote should help: http://www.interactivewebs.com/blog/index.php/server-tips/ad-fs-certificate-rollover-crm-2011/
Hi There. Many thanks for your info here. I manged to get IFD working after much effort (only 10 goes you say? You did well). I had so many other issues on top of your great advice here.
My 2 cents is that the wildcard certificate and IIS (bindings in particular) have to be PERFECT. The Windows server OS seems to really struggle with changing them later. I am not a Server Admin – I do CRM.
Thanks again for sharing your knowledge.
Glad to be of assistance!
Hi, I have added some related info and referenced your blog (quite a bit);
http://wp.me/p2CNA6-1P
Hope this is useful to others.
Ian
Pingback: CRM 2011 and Claims Based Authentication with Internet Facing Deployment « IanCRM
Hi, I have an issue with the CRM addin 🙁
When I try to configure this addin, I entered the url, all organisation appears (great), but after selected one organisation, when I click on OK, I received this error “The server adress (URL) is not valid.”, but it’s valid, and the configuration wizard is able to connect to my CRM (I have the organiszation list in the wizard).
So, why he can connect to retrieve organisation and not for the connection ? One strange element : the wizard doesn’t ask me to enter my credential.
Remark: it’s not a permission issue, I can connect to the CRM with a browser.
Thanks,
Sounds like it could be a DNS issue. Check you can ping the URL from all servers in question. Perhaps one of the servers is looking at an external DNS server that cannot access a response to the URL? Just an idea.
Accolades on your post. We (my dba and I) have struggled with this setup for several months. Install, unistall, reinstall, reconfigure. Pain.
I am so close, but this is where I am stopped every time. Thoughts? Single test server with CRM2011 + AD FS 2.0
HTTP Error 503. The service is unavailable.
https://internalcrm.domain.com:444/FederationMetadata/2007-06/FederationMetadata.xml
The IIS apppool might not be started or cannot start. That’s a fairly common cause for 503. Or it could be that the wrong app pool is applied.
Thought on this?
HTTP Error 503. The service is unavailable. https://internalcrm.domain.com:444/FederationMetadata/2007-06/FederationMetadata.xml
The IIS apppool might not be started or cannot start. That’s a fairly common cause for 503.
Hi! I had the same problem has Ankit Shah, namely “Error message: MSIS7612: Each party on relying trust must be unique across all relying party trusts in ADFS 2.0″
This is because my identifier for the CRM Claim relying party was auth.domainname.dom, so could’nt have the same identifier for the CRM IFD relying party.
I followed your tutorial for the second time 🙂 the tutorial is really good overall but I got confused with the internalcrm thing. https://internalcrm.interactivewebs.com:444
I thought internalcrm was your CRM ORG name.
So for CRM claim relying party I was inputing the federation metadata such as https://crmorgname.domainname.dom:444/FederationMetadata/2007-06/FederationMetadata.xml
Then because of this it set up the identifier as auth.domainname.dom
I have solved this issue by inputting the followinf for the CRM Claim Relying party https://servername.domainname.dom:444FederationMetadata/2007-06/FederationMetadata.xml
I still don’t know what internalcrm represent in your tutorial!? because you say your servername is VSERVER08 and your crm org is crm or crm2011
internalcrm – represents the call to the hosting server while on the server. This is a call to the CRM server from IE on that exact server.
Hope this helps. -= Thanks for your notes… it all helps.
Just to clarify my post above.
The Web Application Server address should be set as said like in this tutorial.
Like this . https://internalcrm.interactivewebs.com:444
internalcrm shouldn’t be replaced by Server name nor by Org name.
It will work somehow but make some conflict
Hi Great article, I have setup internal sinal sign on and it works great. I set up the external url https://auth.domainname.com to point to my adfs proxy server but when i browse to that site it just gives me the blank adfs site. Is there something I need to do on the adfs proxy server?
Actually this is hard to say, is it could be that or a DNS issue for local vs external browsing.
Sorry forget to ask my fourth question.
4.) Does ADFS 2.0 installation for IFD has some impact on AD server(i.e trusted domain)
See the other links posted.
This is a bit off topic, but your blog post seems the most in-depth and applicable than anything else I’ve read.
We are trying to set up a second IFD instance of CRM on our network. So, we’ll have:
org.domain.com
and
stagingorg.domain.com
using different servers, different SQL databases, etc. That way, we can test any changes in our staging environment without breaking production.
We’ve been told we can’t have two IFD CRM environments with the same SQL database names (even though the databases are on separate SQL servers). So, we’ve got ORG_MSCRM and STAGINGORG_MSCRM.
Is that right? What is the connection between the database names and the IFD configuration, if any?
Thanks for the assistance.
You know that has never come up, and does not sound correct to me tither. Probably what people are talking about is this.
1. CRM is recommended to only use the “CRM Tools and Methods” for setup and configuration. i.e. don’t get under the hood too much.
2. When you setup a new instance of a CRM org, you name it and the name that is used is the same name that is used in the SQL name convention. For this reason, there cannot be two instances that have the same SQL name, as they are going to be needing to have the same org name.
That’s my guess, but I would encourage you not to try anything too tricky with CRM. Think of it as a bundle of fly paper just waiting to get you all sticky!
Hi I am getting IE cannot display the webpage error on the link below
https://internalcrm.domain.com:444/FederationMetadata/2007-06/FederationMetadata.xml
I have confirmed and checked the permissions for certificate.
When I try the same link with HTTP, it works
http://internalcrm.domain.com:444/FederationMetadata/2007-06/FederationMetadata.xml
Any suggestions
Start by pinging the sub domain locally and ensuring that DNS gives you back the correct machine.
Check that IIS instances are started / restarted.
I did had to rerun the complete configuration .found the issue was with previous install
However, now i get to sts1 website, after entering the credentials it fails and i see following error in the event log
Log Name: Application
Source: ASP.NET 4.0.30319.0
Date: 30/10/2012 9:51:25 AM
Event ID: 1309
Task Category: Web Event
Level: Warning
Keywords: Classic
User: N/A
Computer: server2.server.local
Description:
Event code: 3005
Event message: An unhandled exception has occurred.
Event time: 30/10/2012 9:51:25 AM
Event time (UTC): 29/10/2012 11:51:25 PM
Event ID: 7c339ca2dce145689f5abf3b2a02c1b1
Event sequence: 19
Event occurrence: 2
Event detail code: 0
Application information:
Application domain: /LM/W3SVC/3/ROOT-1-129960281925603730
Trust level: Full
Application Virtual Path: /
Application Path: E:\Apps\Microsoft Dynamics CRM\CRMWeb\
Machine name: server2
Process information:
Process ID: 1308
Process name: w3wp.exe
Account name: server\SPSERVICE
Exception information:
Exception type: CrmSecurityException
Exception message: Could not find GUID for server: server2$ With SearchFilter:samAccountName
at Microsoft.Crm.SecurityUtils.GetGuid(String searchItem, String searchFilter, String searchItemLogInfo, Boolean exceptionIfNotfound)
at Microsoft.Crm.SecurityUtils.GetLocalSystemGuid()
at Microsoft.Crm.Caching.OrganizationSettingsCacheLoader.LoadCacheData(Guid key, ExecutionContext context)
Request information:
Request URL: https://server2.server.com.au:443/default.aspx
Request path: /default.aspx
User host address: 192.168.1.1
User:
Is authenticated: False
Authentication Type:
Thread account name: server\SPSERVICE
Thread information:
Thread ID: 3
Thread account name: server\SPSERVICE
Is impersonating: False
Stack trace: at Microsoft.Crm.SecurityUtils.GetGuid(String searchItem, String searchFilter, String searchItemLogInfo, Boolean exceptionIfNotfound)
at Microsoft.Crm.SecurityUtils.GetLocalSystemGuid()
at Microsoft.Crm.Caching.OrganizationSettingsCacheLoader.LoadCacheData(Guid key, ExecutionContext context)
Hello, thanks for your job.
One thing that i don’t understand. You use DNS name org.domain.com for your customer on CRM but is it also possible to use crm.domain.com/customera for example ?
I’m using CRM 2011 from SPLA and i would like to know if i can use these names in my environment with IFD ?
Thanks again!
No this is not possible. Microsoft has a different internal name space for users inside the domain.
There could be some hack for this, but I doubt it.
Ok thanks but how did you configure email router ?
When i try to use https://crm-demo.domain.com in deployment tab i have the error : “”You need to specify a discovery Microsoft Dynamics CRM 2011 discovery URL followed by the name of the organization (example : http://discoverserver:80/myorg)”…
Someone ?
http://www.interactivewebs.com/blog/index.php/server-tips/ad-fs-certificate-rollover-crm-2011/
Hi…I have wild card certificate which is going to expire on 21st nov,2012.So please tell me what are the steps which I have to follow to to update certificate and ADFS 2.0.
1.Does I have to attached renewed certificate again to default website and CRM website.
2.Does I have to add these entry again to MMC for personal and Trusted certificate.
If Not,then do let me know what are the steps that need to perform as still there are 20 days for certificate expiration.
Please Help…It’s urgent.
This will probably help you:
http://www.interactivewebs.com/blog/index.php/server-tips/ad-fs-certificate-rollover-crm-2011/
Wonderful Blog. Appreciate your tremendous Hardwork.
I was able to successfully configure IFD in my Test VM.
Great work!!
Thanks for the kudos.
Pingback: Configuring CRM 2011 Internet Facing Deployment (IFD) - Peter Bursky's Website
“Note: If the CRM Outlook client configuration using the old binding value, then the need to be updated to use the new value. + Make sure you have a DNS entry for: internalcrm.” – Where would you create the DNS entry? Thanks.
That would be on whatever DNS server your internal computers are configured to talk to. Remember that your DNS servers can be configured on network settings, or individually on computers. You can do an IPCONFIG at a command prompt and see what the individual computers are referencing for the DNS server. It is that server that needs to anser correctly.
Our domain is hosted with our ISP so I have got them to forward the following sub-domains to our server:
sts.ourdomain.com
auth.ourdomain.com
dev.ourdomain.com
orgname.ourdomain.com
I guess I also need them to forward the internalcrm.ourdomain.com as well…and then do I need to create an internal DNS record for this?
Hi,
I’m wondering if you can use one ADFS server for two CRM 2011 environments. For example a Live and DEV environment being authenticated using one ADFS server. Do you have any information please?
Thank you,
Dave
You should be able to do that. Certainly you can run it against multiple deployments on the same server, so can’t think of a reason now why you could not run it against multiple servers. But honestly I am far from an expert on ADFS, so hopefully someone may chime in with a suggestion here.
I understand the the single server installation and done this many times. First one using this guide which is very good! The only thing I don’t understand with multiple CRM environments/servers is the DNS pointers. For example sts1 points to the ADFS server and auth and Dev point the the CRM environment. How would this work with multiple environments? How would ADFS know which environment to point the users to? Would you need for example sts2 auth2 and Dev2? Any help would be greatly appreciated.
If you are talking about multiple AD servers and authentications, then you would need to set that up as a trust. This way the ADFS will talk to any authenticated AD server and know the details to authenticate against.
Remember if you have different internal to external IP or network addresses, you can hard code a server to look in at a certain IP address range using the HOSTS file on that server. This has a higher priority from any DNS lookup that the server in question may do when working out where / who to call.
When I try and access https://internalcrm.ourdomain.com/ I get the windows security pop up box asking for login credentials and then get “401 – Unauthorized: Access is denied due to invalid credentials. You do not have permission to view this directory or page using the credentials that you supplied.”
Any ideas?
I have followed each and every step of you and i have succesfully configured Claims and IFD manually. But i want to automate the process .. So im going with the Powershell cmdlets
Manually when i configure using the wizard, it is done perfectly and and everything works fine and Even teh Powershell cmlts for changing teh web bindings from https to https and Claims settings work, but the moment i run the powershell commands to configure the IFD, it executes with no error but when i manually configure the IFD again to check the values that has been set, what i see is the “next” button in external url window is disabled(see the pic in below url) and it doesn’t even let me enter anything there..
http://social.microsoft.com/Forums/getfile/216095
can any one help me out here
in below url pic you can see the powershell cmdlets im running, even if i set all the web bindings and claims settings through powershell and IFD settings manually though wizard, it works perfectly, but the only problem for me now are the IFD Configuring Commands.
http://social.microsoft.com/Forums/getfile/216099
is there anything that im missing there????
the only problem that im facing here is with the IFD Cmdlets , plz help me brother.
Sorry.. I have nothing for you with this. If anyone reading can assist, that would be appreciated.
Pingback: Configuring CRM 2011 IFD in a single VM | Sanghamitra Samantaray
Yeah! It was terrific experience for me too. Microsoft documentation really useless in my case too. 🙁
Atlast I succeeded in this configuration 🙂
Glad to have been of assistance!
certreq-submit -attrib is not recoginsed as inernal/external command plese help me am stuck on this step
Assuming you typed the command correctly, you should be accessing a file called: C:\Windows\System32\certreq.exe Note that the location of the system32 files are normally mapped on Windows boot to allow you to find this file from any directory on CMD. If this is not the case, try running the command while you are in the C:\Windows\System32\ directory. In the command prompt, type “cd C:\Windows\System32\” and ENTER. This should take you to the location of the certreq.exe program. If that program is not in that folder, you have other problems!
Hi ineractive webs.. can you tell me how can i automate adding up rules in ADFS server?
Sorry no, don’t know that one.
a simple google search found the solution :p
http://www.liberalcode.com/2013/04/automating-adfs-configuration-for-crm.html
Thanks for that.
thanks, it has done the job
Awesome blog.
A bit off topic here, getting ready to deploy ADFS with TFS/client cert auth with CRM, checking if you have done this before, any gotchas?
Please let me know.
Thanks
Have not done this exactly before. To tell you the truth, we have kind of moved away from TFS to other technologies, as there was a time where TFS was just plain too hard to get working on the net for remote users use. Other technologies seam to work from the ground up being web based, and not requiring out of this world licensing.
Sorry typo did not mean TFS meant ADFS with TLS/client cert authentication with CRM, any gotchas please?
I have an issue with IFD CRM. Am trying to connect to crm with network credentials. but it throwing as “The NetworkCredentials provided were unable to create a Kerberos credential, see inner exception for details.” and am able to connect to crm with username and password.
Please help me….
This actually sounds like when your CRM is on one domain, but your creating a token from another domain. Not sure that this will be easily resolved. I have not really ever tried this config and suspect you may be stuck.
Thank you.
This tutorial saves me hours!!!
Pleasure. Please consider us for any Portal integration work you may have.
Afterconfiguring the relying party trusts rules and try to test my user credentials fail https://internalcrm!!! can anyone help?
Hello,
I need to implement device authentication in crm dynamics 2011 on-premise while going from online to offline mode in outlook 2010 , I mean offline mode of crm dynamics should only be accessible if system /device is registered with organization active directory else CRM database should not be synchronized to local machine..
Any help is welcome.
Could you assign IP addresses based on MAC – in your network admin? Or is this for IFD and internet hosted devices?
Hello All,
I deployed CRM2011 with ADFS and it is working very well inside my organization.
I don’t want to you use IFD, but would like to use CBA to pointed to the public IP.
Can this work that way?
I register the DNS for both CRM and ADFS, but when trying to access the site from outside, ADSF will fail loading. But inside my network CRM will work fine.
Can someone explain the raison why it is failing.
Its awesome blog…. Thanks for this stuff, its really helpful for newbie… \m/
Hi,
We have deployed MSCRM for IFD. The instance is working fine. But the custom applications added to it are not opening up. Say, we have a custom import tool in the ribbon. The ttol could not be opened from Public access of MSCRM. Showing up . Error details as below:
InvalidOperationException was unhandled by user code
Message=The user authentication failed!
Source=Microsoft.Xrm.Sdk
StackTrace:
at Microsoft.Xrm.Sdk.ClientExceptionHelper.Assert(Boolean condition, String message)
at Microsoft.Xrm.Sdk.Client.ServiceProxy`1.AuthenticateCore()
at Microsoft.Xrm.Sdk.Client.ServiceProxy`1.Authenticate()
at Microsoft.Xrm.Sdk.Client.ServiceProxy`1.ValidateAuthentication()
at Microsoft.Xrm.Sdk.Client.ServiceProxy`1.get_ServiceChannel()
at Microsoft.Xrm.Sdk.Client.ServiceContextInitializer`1.Initialize(ServiceProxy`1 proxy)
at Microsoft.Xrm.Sdk.Client.ServiceContextInitializer`1..ctor(ServiceProxy`1 proxy)
at Microsoft.Xrm.Sdk.Client.OrganizationServiceContextInitializer..ctor(OrganizationServiceProxy proxy)
at Microsoft.Xrm.Sdk.Client.OrganizationServiceProxy.ExecuteCore(OrganizationRequest request)
at Microsoft.Xrm.Sdk.Client.OrganizationServiceProxy.Execute(OrganizationRequest request)
at _Default.PopulateStatusList(IOrganizationService service) in D:\—–\Default.aspx.vb:line 110
at _Default.form1_Init(Object sender, EventArgs e) in D:\—-\Default.aspx.vb:line 334
at System.Web.UI.Control.OnInit(EventArgs e)
at System.Web.UI.HtmlControls.HtmlForm.OnInit(EventArgs e)
at System.Web.UI.Control.InitRecursive(Control namingContainer)
at System.Web.UI.Control.InitRecursive(Control namingContainer)
at System.Web.UI.Page.ProcessRequestMain(Boolean includeStagesBeforeAsyncPoint, Boolean includeStagesAfterAsyncPoint)
InnerException:
Please help us in identifying the issue.
Don’t know about this one. Perhaps someone else who reads this can assist. If you find a solution, please post it.
Pingback: Microsoft CRM IFD SSL Certificate Renewal | InteractiveWebs Technical Support
ADFS Proxy config is missing. Publishing MSCRM and ADFS directly to the internet is extreme security threat.
Thanks Tomasz. We are saying how to get things working, not a security best practice. We would always recommend a security layer.
Pingback: Microsoft CRM 2011 IFD | @LearnSlate
I ahve configures the same Way, however my report records are having internal CRM link. and they are not accessiable via Public Domain Machine. Please let me know how can i use teh External Link under Web address and what all changes in need to made for working Internally and Externally. My current setup is having 2 Applications server. 1 internal and 1 external (in DMZ).
I think we would need to take a look at the setup to comment. Sorry, we cannot be more assistance here.
The Steup is Simple
1. First Application Server – Internal IP Address
2. Second App Server – External IP Address (IN DMZ)
3. SQL Server (Internal – having access to External and Internal all required ports are opened)
4. IFD site is running Fine.
5. We have just noticied that the Report data is having IFD machine name as link, which in a way is not accessiable via Public IP Users.as they arr not connected to VPN.
6. WebResource Links are having IFD Machine name as mentioned above in setup help from you.
My question does changing WebResource links in Deployment Manager would work fine. or Do we need to make anyother chnages.
Thanks
Thank you having taken the time to create this article. I was tasked with creating a new deployment for my company to use in house and, as you well know, this was a b*tch to set up. Many thanks and take care. I followed all the steps and now I have a functional CRM deployment…now, I gotta learn how to use it, haha.
Not a problem.
Hi, first of all thanks for your guide. I just have 2 question if help me :
1.I want to test IFD then Buy Certificate, there is anyway to do that?
2.i don’t have Static Ip (dedicated Ip),as I said before I want to test this way and then bought certificate and Ip .so any way existed to did it without having Static IP?!
Thank you so much
1. Use a class 1 certificate from http://www.startssl.com/ They are almost free.
2. Setup a virtual machine, and give the virtual machine 2 NIC’s. You will need static IP addresses, but you can at least access them internally.
If the goal is to go public, you will have a lot less trouble to just jump into it. Modifying the guide to do a locally hosted static IP Virtual environment is tricky for IFD, and defeats the purpose. Internet Facing Deployment as the name suggests is not for internal facing systems.
I was having troubles with MSIS7012/MSIS3127 error messages. In the end I found that this was to do with the “Relying Party Trusts” – “Issuance Transform Rules” number 3 “Transform Windows Account Name to Name”.
The guide says to setup with the following on both claims:
Incoming Claim Type = Windows Account Name
Outgoing Claim Type = Name
Name isn’t an option but the screen allows you to directly type in here. I followed the guide exactly and and I suspect that there was an update that puts in now as “* Name”.
Hi, does anyone knows how to revert the configuration from ADFS to not use ADFS anymore in CRM 2011? we configured ADFS with CRM, but not we need to remove it. Any type of instructions on how to do it? I have not been able to find anything like that?
It should be easy enough to remove the entries you put in place as per this article, then restart IIS.
thank you so much for best guid ever,i finally did it.but i have one small problem. before that i had to say i create certificate by Makecert (wild Certificate) and everything work fine for test enviroment(VMWare).domain controller and CRM and AFDS , all of them installed on one Virtual machine Windows server 2008 R2.other client with out problem can connect to internalcrm.company.local but i can’t log in to crm by server itself.i mean when i enter user and password for loging to CRM don’t accept it and give me error “HTTP Error 401.1 – Unauthorized”
“You do not have permission to view this directory or page using the credentials that you supplied”
but these same user and password work perfectly on another computer machin in network.
i hope someone here can help me to fix it and can log in to internalcrm from server computer.
I am getting same error “HTTP Error 401.1 – Unauthorized”
not able to help please help.
Thanks.
Sounds like the IIS Application pool may not be running on NetworkService and or the files in the folder chosen for the directories used for the website / sites may not have networkservice permissions set correctly.
Do you happen to know if CRM 2011 is compatible with ADFS 3.0? I’m trying to configure claims based authentication. With 2.0, it works. With 3.0, I get redirected to the ADFS page and get the follow error when logging in.
An error occurred
An error occurred. Contact your administrator for more information.
Error details
Activity ID: 00000000-0000-0000-e402-0080000000d1
Error time: Thu, 02 Jul 2015 16:11:27 GMT
Cookie: enabled
User agent string: Mozilla/5.0 (Macintosh; Intel Mac OS X 10_10_3) AppleWebKit/600.6.3 (KHTML, like Gecko) Version/8.0.6 Safari/600.6.3
It is not.
This is awesome. Can you expand this to include an ADFS Proxy Server in the DMZ. ADFS and CRM are inside the company net.
Not with CRM 2011. But with CRM 2013 and 2015 you could.
Hy JVR, well we have that kind of setup and it works just fine. What fu..ed with me a bit was the fact that after setting up ifd access everything seemed to work just fine. Except when you try to “Download” the Organization Service WSDL when you are connected to the CRM Organization via IFD. Did anyone encouter these problems too? Or maybe you never realised that it doesnt work. I can give u a hint if you stumble upon it. Regards, Thomas
No, it should work if you have it set up correctly. This will allow remote programming on that URL.
Hi JVR and Interactive Webs
Firstly let me say that this is probably the best step by step guide out there, but I am STUCK!
JVR Did you ever come right with your setup? I am trying to do the same as you, with ADFS 3.0 and CRM 2015 servers on the inside, as two separate servers and a DFS Proxy server in the DMZ. Our CRM has been up and running a while now and I have to make it available on the internet for our internal staff.
I already have an ADFS Proxy server up and running in the DMZ – (it was set up for a SharePoint site). I now need the steps to do the same for our CRM. I can access my sts URL from the DMZ. The Certificate is fine there. Here I already had a standard SSL certificate in place.
When I run the CRM claims based wizard on the CRM server, I get a certificate error. . In the wizard I choose the wildcard certificate I used on the CRM website and it is in the personal store and the wizard tells me that it cannot find the certificate in the personal store on the local machine!? What now?
Another thing – With the sub domains that have to be entered into DNS – I presume that these are on the external DNS server. Do these hostnames have to appear on the internal DNS as well? How does one handle an external CRM URL differently to the internal address? For example, if you use crm.domain.com as the external URL and internalcrm.domain.com as the internal URL ( which is URL accessed by Dynamics CRM for Outlook)?
Can someone please tell me what Auth, dev, and orgname DNS entries are for? Why all these DNS entries? Do they all point to our external public IP address and then do they all route to our internal CRM server? or which servers do each route to? I need clarification here please.
Also, can someone tell me WHY you cannot use a self signed wildcard certificate if the site is for internal staff only?
Sorry for all the questions, but I really do need assistance. Any help will be greatly appreciated before I tear my hair out! 🙂
Hard to say exactly how we may be able to assist you. Ordinarily when you get the server certificate error it is because you have not installed the certificate correctly to be visible to the server. Double-check your work in the server certificate installation area.
With regard to the DNS settings. It is always best if your internal DNS is hitting your external DNS and returning the appropriate IP address. In a simple configuration like this where you’re not using firewalls and software to work on internal facing IP addresses and external facing IP addresses, and it is best that they resolve internally and externally.
The different DNS entities how to help you segregate biome name the different calls that are made for the CRM setup. We are just following the recommended names that are suggested in one of the Microsoft set up documents. They could in effect be anything at all. Are you TH for example is used for your authentication URL. Where the dev is used for your development URL. But these could be anything.
Hi. Thank you for your reply. I have now been able to go right through to the end of Configuring Claims-based authentication without certificate errors! Everything went smoothly until I finished entering the rules and did an iisreset. I enter the internal URL and I see it going via sts, but then I get HTTP 400 Bad Request and the webpage cannot be found. I have checked the Internal Relying Party Properties and the URL tests validates successfully. Up until this point I could access the CRM with the internal URL! The only difference I have between your setup and my setup is that the Certificate on ADFS has a SSL Server certificate and does not use the same wildcard certificate that the CRM site uses because the ADFS server was set up a long time ago for a SharePoint site.
I do not however, get certificate errors.
I have set a service principal name as you suggested above and that did not help either.
I have turned on AD FS Tracking (Debug) on and it shows no errors – only information event IDs 54 and 155.
I don’t know where else to look and now no-one can work on the CRM!!! Please help!
In the Event Viewer of CRM Server I get Event ID 18732 errors. I have googled this and tried changing order of Providers as one person suggested – didn’t help.
Trying to Setup new Application Server(Have access to one new server and would like to migrate). is there any way I can run both servers till I’m happy with the new one to replace the old(Live Server)?
Sorry I’m running CRM 2011 Rollup 18.
The current server is Windows Server 2008 R2 and the New Server is Windows Server 2012 R2 Datacenter.
Don’t understand the question.
using a new domain is the easy way to do this. We have a new domain for each instance of CRM we run on.