E-Mail Anti-Spam Settings
– Using Only SmarterMail Anti-Spam Tools and No Wizard
Beginning with SmarterMail 6, SmarterTools began incorporating some very powerful tools into the SmarterMail e-mail server software which made the control of undesired SPAM much easier.
Prior to version 6 of the SmarterMail software, it was necessary to maintain blacklists, build complicated tables of undesired words, phrases, IP address, e-mail addresses, and domains – all of which changed almost every hour.
The spammers knew the ISPs and e-mail server operators were up against a wall and, in spite of new state and federal regulations being put into place almost daily, continued to churn out ever more junk mail because they were unconcerned with being stopped or caught. With the introduction of SmarterMail version 6, the tide began to turn in favor of the e-mail server operators.
Between the more frequent adaptation of SPF, the general requirement of large ISPs that mail server operators have both IN-ARPA [reverse DNS] AND PTR records pointing back at the HOST and MX records of their respective mail servers, and the new tools being coded into the SmarterMail e-mail server system, e-mail server operators finally began to accumulate an arsenal in the war of the spammers vs the mail server operators.
In July 2009, ChicagoNetTech converted from IMail to SmarterMail version 5. Within a week of our purchase and conversation, SmarterTools introduced the BETA of SmarterMail version 6, and with SmarterMail Version 6 BETA, a powerful new set of anti-spam tools which would change our relationship with our customers significantly.
As ChicagoNetTech began to work with SmarterMail version 6 BETA, and experimented with various anti-spam configurations, and soon found the tools introduced with SmarterMail version 6 beta allowed some very powerful capabilities in the fight against spammers.
After testing with one of our minor domains, we decided to “flip the switch” and ran the new anti-spam settings we were using on just one domain on all of the domains. Suddenly, instead of complaints about the large quantities of spam users previously received in their in-boxes, we were receiving compliments about how pleasant it was to open their e-mail in the morning and find that everything in those boxes was 100% related to business.
The spam was gone, the customers were extremely happy, and we have not looked back since then.
In July of 2009, after assisting many SmarterMail admins on the SmarterMail forum with anti-spam issues, I decided to publish my settings for the benefit of everyone’s SmarterMail installations.
Since then many have adopted and, to their surprise, have had similar results to those we experienced from the beginning.
Unfortunately the software used for the SmarterMail forums allows for a limited number of characters in each post. Thus it was necessary split the original post into two sections. The forum software also limits the number of images in any given post and that has resulted in many questions as to the implementation of specifics relating to the anti-spam settings effectively implemented on our and other SmarterMail server operators.
This document will restate those settings, in somewhat greater detail, along with IETF specifications relating to why they work and why you should make certain you are in full compliance with both IETF requirements and recommendations.
The antispam settings listed below are the settings currently used by ChicagoNetTech Inc, an ISP in Chicago Illinois, with client base consisting primarily of not-for-profit agencies, healthcare facilities, and small businesses. ChicagoNetTech runs SmarterTool’s SmarterMail Enterprise version 9 – latest available software release.
These settings are based on SmarterMail Enterprise Edition, Version 9. Non-Enterprise, as well as versions earlier than version 9 may have slightly different settings or screens. More information about the differences in SmarterMail versions is available on the SmarterMail Version Comparison Page.
Many thanks for the proofreading and editing assistance provided by Jim Murphy of Digital Webby who is also a user of, and a regular in, the SmarterMail forums.
1. Setup your primary GREYLISTING settings:
To do this, login as the primary ADMIN for the SmarterMail server and goto:
SECURITY è GREYLISTING è OPTIONS
– SELECT ENABLE GREYLISTING
– UNSELECT ENABLE USERS TO OVERRIDE GREYLISTING
– SET your BLOCK PERIOD – we use 4 minutes
– SET your PASS PERIOD – we use 360 minutes
– SET your RECORD EXPIRATION – we use 36 days

The Greylisting settings shown above reject an e-mail sent to your mail server by anyone who has not sent e-mail to your server for the past 36 days with a notification to the sending e-mail server that the message was GREYLISTED, in accordance with RFC 821. The Greylisting rejection message will include a notification that the sending server should RETRY the message again after a specific number of seconds.
In our case the GREYLISTING BLOCK PERIOD is 4 minutes or 240 SECONDS
When someone who has not sent an e-mail to someone hosted on our SmarterMail server SmarterMail checks to see if they have e-mailed the intended recipient previously. If they have, and the previous delivery timeframe falls within the record expiration period, the message is allowed to be delivered, provided it does not meet other anti-spam measures.
If not, the initial Greylisting rejection response issued by SmarterMail is:
“rsp: 451 Greylisted, please try again in 240 seconds”
If the sending mail server attempts to resend the original message prior to the 240 second wait period expiring, they will receive another ““rsp: 451 Greylisted, please try again in XXX seconds”, where XXX is the difference between the initial send time and XXX is the time remaining until the 240 second wait time has expired.
If they send the same message after 240 seconds, but do not wait longer than 360 minutes, then the mail server white lists the sending mail server’s ability to send to the e-mail address the message was originally sent to for a period of 36 days.
Greylisting works for two reasons:
A. Because most spammers attempt to send an e-mail message only one time. They have so many spam messages in their outbound queue that they want to send them out as quickly as possible, and;
B. Because the International Engineering Task Force [IETF] states that all e-mail server must retry to send an e-mail message for up to a minimum of four [4] days if the message is not deliverable the first time.
The specific IETF rules concerning redelivery attempts are located at: http://www.ietf.org/rfc/rfc2821.txt, http://www.ietf.org/rfc/rfc3261.txt, and http://www.ietf.org/rfc/rfc3265.txt.
For more information about Greylisting, please see www.Greylisting.org
NOTE: GREYLISTING WORKS ON A PER USER E-MAIL ACCOUNT BASIS. Just because jimbeam@sendingdomain.com has been Greylisted for jackdaniels@receivingdomain.com does not mean that jimbeam@sendingdomain.com is now Greylisted for oldfitz@receivingdomain.com. Each time a sending e-mail address sends to a receiving e-mail address on your server which has not received e-mail from the sending e-mail address within the timeframe of the Greylisting table established for your server, they will have to be Greylisted for the receiving e-mail address to which they are sending a message.
Some users will balk at the initial delay imposed on the receipt of messages from “new” senders. Remind them that e-mail is not instant messaging and Greylisting is only a momentary delay – amounting to a mere 4 minutes, under the settings used in our example. You can also remind them that Greylisting plays an important roll in ensuring their e-mail box is not overflowing with junk mail every morning. They will get over it.
To make certain your SmarterMail server installation is properly trying to resend messages which may be Greylisted by receiving mail servers, or otherwise non-deliverable on a temporary basis, you can check your RETRY INTERVAL settings.
SmarterMail’s RETRY INTERVAL SETTINGS are located under:
SETTINGS è GENERAL SETTINGS è SPOOL
IMPORTANT NOTE: YOUR SPOOL PATH MAY BE DIFFERENT THAN THE ONE SHOWN IN THE EXAMPLE BELOW. NEVER ATTEMPT TO CHANGE A SPOOL PATH ON A FUNCTIONING MAIL SERVER!
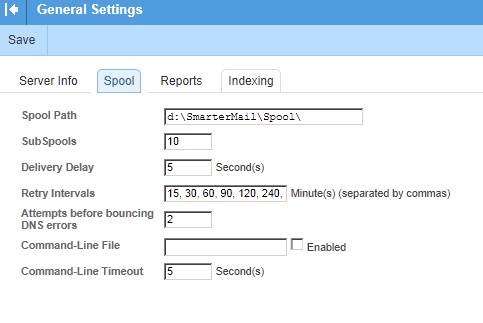
IETF retry requirements call for “shall retry for up to 4 days”, but they do not specify the frequency of the retry attempts. The sooner a message is delivered, the better. In reality however, technology does break down and is not always repaired immediately. Attempting to retry delivery too quickly might not allow a message to be delivered at all, so most ISPs have opted to try several times within the first couple of hours and then retry at longer intervals to allow the receiving ISP time to resolve non-receipt issues.
ChicagoNetTech has opted to run the following retry interval schedule: 15, 30, 60, 90, 120, 240, 480, 960, 1440, 2880 minutes after the initial attempt.
This schedule sets the first retry time for 15 minutes after the initial delivery attempt. If still not deliverable, message delivery is reattempted at 30, 60, 90, and then 120 minutes. After the initial schedule, the amount of time doubles for each successive retry attempt.
In all, the server attempts to retry the delivery for a little more than four days. This satisfies the IETF retry requirement of four days.
If you loose an incoming e-mail message because a server does not retry their deliveries after the first delivery attempt they are either a SPAMMER or non compliant.
If a sending mail server is non-compliant, you do not have an obligation to whitelist them because of their ignorance.
If the receipt of a blocked e-mail is important to you, and/or your client, you may want to try to figure out what caused the problem and notify the sending mail server administrator.
DON’T GET CAUGHT UP IN THE AUTOMATIC WHITELISTNG TRAP!
If a valid ISP has a problem sending e-mail to your server, take the time to find out what the problem is. Your logs will reveal many of the issues for you. You can also use outside DNS testing tools to make certain the sender’s DNS is properly configured.
ISPs and e-mail server operators have an obligation to know how to properly configure both their e-mail server software, firewalls, server operating system software and their DNS records.
NOTES:
Ø DNS records include “A” or “HOST” records, “MX” records, “IN-ARPA” records, and “PTR” records.
Ø PTR is always setup on the LOCAL DNS server.
Ø IN-ARPA record mapping to the e-mail host must always be done by the INTERNET SERVICE or “bandwidth” PROVIDER – the company who provides the connectivity and IP ADDRESS range assignment to the ISP.
Ø You should also setup IN-ARPA mappings for any e-mail domains on your local DNS server(s) by creating reverse DNS mappings for your IP ADDRESS range on your DNS servers.
Ø RFC974, RFC1034 3.6.2, RFC1912 2.4, and RFC2181 10.3 prohibit the use of C-NAME records in MX or mail server host names. All MX records must be mapped to “A” or “HOST” records directly.
Ø ALL IP ADDRESSES ASSIGNED TO PUBLIC E-MAIL SERVERS MUST BE PUBLIC AND AVAIALBLE ON THE INTERNET!
EXAMPLE: The only issue we have ever encountered because of GREYLISTING was with a vendor who does shredding for medical companies who was trying to send an e-mail to one of our customers. The vendor’s e-mail server was configured to attempt to send messages only once. It was not configured to retry if a message was non-deliverable.
When the sending e-mail server encountered the “rsp: 451 Greylisted, please try again in 240 seconds” message, they aborted the process and never resent the message.
When the client complained they had not received the message, we checked the logs and found the problem. The customer asked me to whitelist the domain and IP address and I said no, the vendor needed to fix the configuration of their mail server. I also told our customer I would work with their vendor to resolve the mail server’s configuration so it would not happen in the future.
After contacting our customer’s vendor and explaining the how Greylisting works, along with the requirements that their server must be compliant, the vendor resolved the issues with their mail server’s retry times and we have had no problems with delivery of their e-mail since. The customer’s vendor was unaware of the issue and glad to learn of the problem so it could be corrected.
Because our customer’s vendor’s mail server never attempted to resend the message never got past the greylisting.
2. Once you have configured the GREYLISTING SETTINGS, it is time to configure your ANTI SPAM according to the following settings.
These settings work because they IMMEDIATELY DELETE any incoming message which is found to be from a server that DOES NOT HAVE an IN-ARPA or REVERSE DNS ENTRY.
Messages received from any of the RBL or URIBL are IMMEDIATELY DELETED if they are on one of those lists. If you UNCHECK the column labeled ENABLE FOR SMTP BLOCKING, the CENTER column in the main antispam section, and run according to weights, these settings WILL NOT WORK and you will be back to fighting with spammers.
Protecting your e-mail server from spam depends on total server spam lockdown.
- SETUP AN ACCOUNT WITH BARRACUDA CENTRAL and ADD THE BARRACUDA REPUTATION BLOCK LIST to your ANTISPAM settings.
Before you can begin to use the Barracuda Reputation Block List, you will need to setup an account at Barracuda Central. That account must be linked to the IP ADDRESS used by your e-mail server to RECEIVE e-mail. If you have multiple IP addresses for your SmarterMail server, as in a situation where you have hosted domains with dedicated IP addresses, you will want to list the IP address which is MAPPED TO THE HOST NAME OF THE SERVER ON WHICH SMARTERMAIL IS INSTALLED in your Barracuda account as that is the IP address which will actually contact the BRBL to do the lookup.
To setup your account go to http://www.barracudacentral.org/. Then go to the TOP OF THE PAGE and click on REQUEST ACCESS. This links to http://www.barracudacentral.org/account/register
Once your setup your Barracuda account you will need to configure your SmarterMail server to use it. To add your BRBL listing configuration goto:
SECURITY è ANTISPAM ADMINISTRATION è ADD RBL.
Configure your new RBL as follows:

Once you have entered all of your data into the configuration box, then click SAVE and you have added your new BRBL too to your list of Antispam measures.
B. NOW TURN ON the ANTI-SPAM SETTINGS per the SCREEN CAPTURES SHOWN BELOW:
Your SPAM CHECKS TAB is located at: SECURITY è ANTISPAM ADMINISTRATION è SPAM CHECKS
A note about the settings for each of the line items below:
v Depending on the version of SmarterMail you have, you may not have some of the items shown below;
v Depending on the version of SmarterMail you have, you may have more items than are shown below;
v There is no need to modify the REQUIRED LOOKUP VALUE in any of the items listed below. They all map to localhost addresses in the 127.0.0.X range, where X is always greater than 1, because 1 is always reserved as the LOCALHOAST address in the HOSTS files in Microsoft operating systems.


NOTES:
v By checking the ENABLE FOR SMTP BLOCKING [center] column, all weights are overridden and meaningless. Weights are only used when the ENABLE FOR SMTP BLOCKING column is NOT checked.
v URBL: MailPolice no longer exists and was eliminated in June 2010. SmarterMail was supposed to have removed the URBL for MailPolice in Version 7, but when we installed SmarterMail version 9 it magically re-appeared in the antispam list. Whether you are running pre-SmarterMail version 7, or a later version of SmarterMail, with MailPolice still in the antispam settings, it is easily removed by highlighting, right clicking, and hitting DELETE. Even if left in, it no longer does anything because they are out of business.
v There is no need to check OUTBOUND messages for spam unless you have known spammers on your server, in which case you have a much bigger problem. Most outbound spam is caused by someone hacking your server and sending via one of your hosted accounts. Secure passwords can go a long way toward prevent having your server hacked and hijacked by spammers and are discussed elsewhere in this document.
v Note that we ENABLE REVERSE DNS FILTERING. This checks to see if the sending e-mail server has a public IN-ARPA or REVERSE DNS entry which maps to the sending e-mail server’s HOST NAME and IP ADDRESS.
v While not REQUIRED by the IETF, RFC1912 2.1 says you SHOULD HAVE a reverse DNS for all your mail servers. It is strongly urged that you have them, as many mailservers will not accept mail from mailservers with no reverse DNS entry.
v With ENABLE REVERSE DNS checked in the ENABLE FOR INCOMNG SMTP BLOCKING column, anyone who does not have BOTH an IN-ARPA or REVERSE DNS AND a PTR entry associated with the IP ADDRESS of their primary mail server will be unceremoniously disconnected and their message will not be accepted by your mail server. This is an extremely important antispam setting as most spammers will not make the effort to, or will be blocked from, setting up an IN-ARPA address.
v Anything checked in the “ENABLE FOR INCOMING SMTP BLOCKING” column will UNCEREMONIOUSLY DELETE an incoming message which meets the criteria. Mail Servers are notified you are using SMTP Blocking with the following message:
“554 Sending address not accepted due to spam filter”
v These settings do not use content filtering. I strongly suggest you do not use content filtering in addition to these settings because the maintenance of any content filtering is a maintenance intensive, self-loathing task which is never done. Should you choose to enable content filtering in addition to the settings suggested in this document, you may run the risk of having your e-mail server tagged as a spammer by BACKSCATTER.ORG, BARRACUDA, and SORBS. You do not want to put yourself in that position.
To DISABLE BACKSCATTER, goto
SECURITY è ANTISPAM ADMINISTRATION è OPTIONS and make certain you have set CONTENT FILTER BOUNDING to DISABLED. It should be configured as follows:

Note: Your Auto-Responder, Spool Proc, and Catch-All settings may be different.
ü Your DomainKeys may be set to different values, ours are set as follows:

ü Your DKIM settings may be set to different values, ours are set as follows:

ü We have initiated some different settings for SPF records. Our SPF is set as follows:

C. FILTERING:
The FILTERING settings are available under:
SECURITIY è ANTISPAM ADMINISTRATION è FILTERING
We initially set our LOW PROBABILITY to PREFIX SUBJECT WITH TEXT [**** Junk E-Mail ****] to make certain we were not deleting legitimate e-mail.
Once you are comfortable with the new antispam settings, and are convinced you are not turning away legit e-mail, you can change LOW to DELETE if you like. If you are more comfortable with initially setting the MEDIUM or HIGH to PREFIX or MOVE, please feel free to do so.

In order to alleviate any confusion about what we show in the SMTP BLOCKING screen, I have include a capture from our SmarterMail setup below. Your settings may be different.

D. OPTIONS:
The following options are available under:
SETTINGSè DEFAULTS è DOMAIN DEFAULTS è TECHNICAL

You will also want to make certain that your PRIMARY IP ADDRESS is properly mapped to your SmarterMail host’s server name.
Because we run TLS on the mail server [available in the Enterprise edition only], and run SSL, we have ALL of our clients setup to use the IP ADDRESS which is bound to our SSL/TLS.
In the event of a failure of that IP ADDRESS, SmarterMail will automatically pick up with the primary IP ADDRESS of the NIC card, which is also bound to all domains, but not as a primary.
Our two MX records point to:
v SECUREMAIL.CHICAGONETTECH.COM, with a PRIORITY of 5, which makes that our PRIMARY e-mail server, running on an IP ADDRESS of 173.165.112.155, and;
v FIFI.CHICAGONETTECH.COM, with a PRIORITY of 10, makes that our SECONDARY e-mail server, running on an IP ADDRESS of 173.165.112.146
Make certain these are both setup in DNS, with the appropriate HOST NAME records, MX records, and PRT records pointing to the HOST NAME records.
The MX record number which is the LOWEST will always be the first to be attempted when e-mail is delivered to your server from outside your domain.
You will also want to have your internet service bandwidth provider, the company who allocates your static IP ADDRESSES, map IN-ARPA or REVERSE DNS entries back to those HOST NAMES for your MX records.
These settings are available under the SmarterMail primary ADMIN account via:
SETTINGS è PROTOCOL SETTINGS è SMTP OUT:

NOTES:
v The OUTBOUND IP is the DEFAULT OUTBOUND IP for all domains hosted on your SmarterMail server. If you host multiple domains with separate IP ADDRESSES assigned to those domains, or you have SSL setup to use a specific IP ADDRESS as would probably be the case if you have enabled TLS, then you may need to change this default IP ADDRESS for specific domains or services.
v If you run more than one domain on SmarterMail, remember to check the OUTBOUND IP address for each domain you host. This can be found by selecting the domain, EDITING the domain settings and then navigating to the TECHNICAL TAB and selecting the OUTBOUND IP address from the drop down box. If you should ever have to change IP address ranges, or add additional IP ADDRESSES to the server hosting your SmarterMail installation, it will be necessary to change the outbound IP ADDRESS in EVERY domain you host via these settings.
v DO NOT CHECK the DISABLE GREYLISTING box. If it is checked, UNCHECK it. Allowing users or domains to disable greylisting will override one of the most important aspects of your new anti-spam settings and result in your users, once again, being deluged in spam.
v The EXCLUDE IP FROM RECEIVED LINE was added in SmarterMail version 9. While this may be something which is perceived as being needed by some admins, I highly recommend NOT checking this box.
v In our case, we have TLS enabled. TLS is an encryption protocol which became available in SmarterMail 8.
v Beginning with the most recent versions of SmarterMail 9, TLS is available on a PER DOMAIN basis and is enabled or disabled only after enabling TLS on the SmarterMail server, via the TECHNICAL TAB under EDIT DOMAIN. TLS must be enable in BOTH AREAS for TLS to be available for a domain.
So, now that I have told you we have TLS enabled, you may wonder, what does TLS do and why is TLS important?
TLS enables the full encryption of e-mail, along every step of the message chain, from the desktop to the recipient, where the inter-transport e-mail servers also support TLS and an SSL encryption is used between the desktop and the SmarterMail server.
ü TLS uses PUBLIC KEY CERTIFICATES to verify the identity of the endpoints;
ü In the case of e-mail servers, these endpoints are the SMTP servers which interconnect to transport the e-mail messages;
ü TLS is the upgrade to the SSL protocol which is now partially depreciated.
ü Both work under SSL certificates;
ü Implementation of SSL in SmarterMail requires you run SmarterMail under IIS and disable the SmarterMail web server;
ü The full benefit of TLS is realized only if e-mail originates either via an SSL web interface or a TLS or SSL encrypted client, whether desktop or SmartPhone;
ü TLS is included only in SmarterMail Enterprise edition;
For more information about SSL/TLS, see: http://en.wikipedia.org/wiki/Transport_Layer_Security.
For information on how to implement SSL/TLS in SmarterMail, see my post at: http://forums.smartertools.com/showthread.php/29845-SM-9-x-and-SSL-(Free-Version)
If you decide to implement TLS on your SmarterMail server you should then test your server to make certain your implementation is working properly.
To test either your SmarterMail TLS installation, or any other e-mail server which claims to be TLS enabled and capable, you can use the free testing tool at: http://www.checktls.com/perl/TestReceiver.pl
Once you have opened the testing website, use the drop-down and select CertDetail after entering a full e-mail address for the server you wish to test. Use the e-mail address of Test@CheckTLS.com to see demonstration output for a properly configured TLS e-mail server.
Here is the summary output for the test e-mail address:
TestReceiver
CheckTLS Confidence Factor for “Test@CheckTLS.com”: 100
| MX Server | Pref | Con- nect |
All- owed |
Can Use |
TLS Adv |
Cert OK |
TLS Neg |
Sndr OK |
Rcvr OK |
| mail2.CheckTLS.com [204.225.38.195] |
20 | OK (1ms) |
OK (4ms) |
OK (1ms) |
OK (1ms) |
OK (207ms) |
OK (6ms) |
OK (78ms) |
OK (4ms) |
| www1.CheckTLS.com [24.123.1.3] |
30 | OK (117ms) |
OK (1,031ms) |
OK (88ms) |
OK (86ms) |
OK (595ms) |
OK (251ms) |
OK (352ms) |
OK (92ms) |
| Average | 100% | 100% | 100% | 100% | 100% | 100% | 100% | 100% |
In the example above the e-mail address, test@checktls.com shows that the e-mail servers used by checktls.com are both capable of fully supporting the TLS encryption protocol and the SSL certificate is both valid, not expired, and properly installed on the server.
The CertDetail level test performed will also generate approximately 5 pages of test data showing all negotiations, results, and certificates used during the testing process.
If this test positively validates a TLS server, then the server is both capable of, and properly configured to use, TLS negotiations and encryption during the process of sending, and receiving, of e-mail messages.
Failure to encrypt e-mail in today’s hacker rich environment can cause unwanted and undesirable results in today’s hacker and corporate raider environment. Every e-mail server operator should consider upgrading their mail server to support TLS and SSL. Read on, McDuff!
RESULTS FROM A NON-TLS COMPLIENT E-MAIL SERVER, or How the FBI and Scotland Yard Shot Themselves In the Foot:
For an interesting sidebar on how the lack of TLS got the FBI and Scotland Yard into trouble with the nefarious group Anonymous, see the following blog:
http://networkbastion.blogspot.com/2012/02/anonymous-vs-fbi.html
Here is the FAILED TLS test from the FBI’s e-mail server:
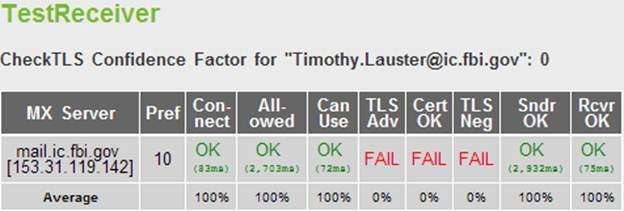
It was not just the FBI’s e-mail server which failed the TLS testing, but the e-mail servers of intelligence groups the United States deals with on a day-by-day basis as we attempt to prevent infiltration of government, military, corporate and personal e-mail communications.
Had TLS been properly installed and tested on the e-mail servers of the various intelligence communities involved, the incident outlined in the blog would probably never have happened.
Out of the six intelligence agencies involved, only three passed the basic TLS encryption security capabilities on their e-mail servers.
NOTES:
v E-Mail servers which run Greylisting may require a second test after a few minutes to display completely accurate results.
v Failure to validate an e-mail address as part of the test does not mean the TLS enabled e-mail server has failed the TLS testing.
E: SETTINGS è PROTOCOL SETTINGS
Make certain you are not an open, or partial open, relay: [Your SMTP BANNER may be different. I keep ours up to date with the current VERSION information whenever we update.]

F: PASSWORDS – the Bain of Every Administrator:
To check your password requirement settings, goto
SECURITY è ADVANCED SETTINGS è PASSWORD REQUIREMENTS
and modify your password settings as necessary.
We currently require passwords to be a minimum of EIGHT [8] characters in length with at least ONE UPPERCASE LETTER, 1 NUMBER and 1 SPECIAL CHARACTER in the password.
We do not allow any exceptions to the password rule. This prevents a lot of headaches because it eliminates short and simple passwords and prevents having our mail server hacked.
Note that setting a minimum of 8 characters does not preclude longer passwords as SmarterMail does not check for a maximum password length. This is actually a good thing because it allows your users to use PASS PHRASES.
So, with the settings show above, both: “rG#34_1@4b” and “meYe d0Ggi3 hA$ f133Z” are acceptable passwords – with the second actually being a pass phrase, which is longer, and easier to remember than the first. They both meet the secure password requirements shown in the password configuration screen below, and they are both secure.
Generally speaking, the longer the password or pass phrase, the more secure it is, and the less likely it is to be hacked by spammers, and the safer your SmarterMail installation will be:

NOTE: leaving the DISABLE PASSWORD STRENGTH FOR EXISTING PASSWORDS box checked will allow users to keep passwords which DO NOT meet the defined password requirements.
Leaving this blank will force everyone to change their passwords to meet the new requirements.
G: FURTHER PROTECTING YOUR SMARTERMAIL E-MAIL SERVER REPUTATION
To help protect your SmarterMail installation, you can do a couple of additional things:
Ø Setup an SPF record which points ONLY to the IP ADDRESS or IP ADDRESSES authorized to send messages from your e-mail server(s). Do NOT use a range. Setup specifically for the e-mail server, or servers, allowed to send. For more information see: http://www.spfwizard.net/
Ø Setup both DOMAIN KEY and DKIM signing:
NOTE: DOMAIN KEYS ARE SPECIFIC TO THE DOMAIN. EACH DOMAIN MUST HAVE A UNIQUE DOMAIN KEY CERTIFICATE.
v These keys are setup on a PER DOMAIN BASIS via the MANAGE tool for the domain.
v To setup DOMAIN KEYS:
Ø SELECT THE DOMAIN FOR WHICH YOU WISH TO CREATE THE KEY
Ø SELECT MANAGE
Ø SELECT SETTINGS è DOMAIN SETTINGS è ADVANCED SETTINGS è MAIL SIGNING è OPTIONS.
v Enable BOTH ENABLE DOMAIN KEY SIGNING and ENABLE DKIM SIGNING
v Then click on the tabs CERTIFICATES, DOMAIN KEYS SIGNING, and DKIM SIGNING, and complete the forms according to the HELP FOR THIS PAGE from SmarterMail. They have done a pretty good job with this section of the help files.
Here is a picture of the process of generating the certificate required for DOMAIN KEYS. Note that the KEY SIZE can be selected as 512, 768, and 1024. Shorter keys require less work on the part of both the sending and receiving e-mail servers but are less secure.
The longer the Domain Key certificate, the better.
Most modern e-mail servers can handle 1024 bit keys without any problems.

v Note the TXT record name? Domain Keys are added to your DNS as TXT records.
v First enter a SELECTOR to differentiate your domainKey and give it a name.
v Now Generate Key. This will both create the TXT Record Name and the TXT Record Value.
v When you add them to the DNS record, the only portion of the TXT RECORD NAME you enter into RECORD NAME portion of the DNS is, according to the example above, is “CNT.domainKey”. [without the quotes]
v The Microsoft GUI DNS tool will automatically append your domain name to the TXT record and create your domainKey certificate record.
v If you are using DNS other than Microsoft’s DNS, consult your DNS to see how to add a TXT record.
v The TXT Record VALUE is your actual certificate and goes into the TXT box of the TXT record. Save both the new TXT record value in SmarterMail and the newly created TXT record in your DNS for the domain, and you should be able to click on the TEST DNS and receive a PASSED notation at the top.
A test of a successful generation, and DNS install, of your domainKey certificate will look like this:

An explanation of DOMAINKEY SIGNING and DKIM SIGNING can be found in the SmarterMail KB at http://help.smartertools.com/SmarterMail/v9/Default.aspx?p=_SA&v=9.0.4408&lang=en-US&page=domainadmin%2ffrmdomainkeys
For more information on DOMAIN KEYS see: http://en.wikipedia.org/wiki/DomainKeys_Identified_Mail and http://www.dkim.org/
H: TEACH YOUR USERS NOT TO RESPOND TO PHISHING E-MAIL MESSAGES!
Sorry if I appear to be shouting, but the long, ALL CAPS, bolded title was deliberate.
General rule of thumb: If you don’t recognize the sender, or were not expecting an attachment, DO NOT OPEN THE MESSAGE – DELETE IT!
Phishing e-mail responses cause more problems with compromised e-mail accounts, identity theft, and compromised business networks and workstations than all other problems combined.
No matter how much you secure your e-mail server, no matter how well you protect your network, no matter how good the tables in your firewalls are constructed, all it takes is one hair-brained user sharing personal information with a total stranger to undo all of your hard work.
The FTC has published an excellent article on Phishing scams, which is available as a FREE PDF from their website, in both English and Spanish, that is both well written and easy to understand.
The FTC’s Phishing Scam article is available on the FTC website at:
http://www.ftc.gov/bcp/edu/pubs/consumer/alerts/alt127.shtm
A downloadable, and re-distributable, PDF version is available at: http://www.ftc.gov/bcp/edu/pubs/consumer/alerts/alt127.pdf
If you are an ISP, make this available for download, via a link from your website or e-mail FAQ page, so that every person who you provide services for has an opportunity to read it.
For your business customers, you have an excellent opportunity to help them run a tighter workplace by making this available to them for distribution to their employees.
If you are a business, you might consider making the FTC’s PDF part of your employment or IT security manual which you distribute to all employees when they are hired.
I: SUMMARY
Once you have your new antispam settings configured you will be able to monitor your server and see the actual results of your efforts.
First, you will have to make certain your logs are set for DETAILED recording of all log data. To do this go to SETTINGS è LOG SETTINGS and make certain you have your logs set to DETAILED for both DELIVERY and SMTP.
Once you have your logs set for detailed logging you can search. Logging can only be performed by SmarterMail admins. To view your SmarterMail logs, go to
MANAGE è VIEW LOGS.
Ø Search both the DELIVERY LOGS and the SMTP logs [be certain to check the ENABLE RELATED TRAFFIC BOX] for
v “rsp: 554 Sending address not accepted due to spam filter“.
v The results will show you which messages were denied messages because of spam and why they are being denied.
Ø You will also be able to see both the spam tests, and results, for the delivery of all other messages processed by the server.
Ø [NOTE: We designed our servers with enough capacity to keep all logs for a minimum of FIVE [5] years because of our medical and healthcare clients. This is in compliance with the new HIPAA / HITECH Agency requirements which were made law in October 2011.]
Ø By using these settings we have close to ELIMINATED our spam problem. It CAN be done and it does not take a lot of effort or extra cost.
Ø Get rid of content filtering. It is a pain to maintain and will drive you crazy trying to stay ahead of the spammers and hackers as they come up with new ways to get around your content filters.
Ø Do not use the wizard. Use the capabilities of the built in antispam tools in SmarterMail to your advantage.
Ø LIMIT WHITELISTING. A well created and properly setup e-mail servers should not have to be whitelisted. Poorly designed and improperly setup e-mail servers are not our problem. They are indicative of someone who does not know what they are doing who should not be running an e-mail server in the first place. It doesn’t cost a lot of money to setup an e-mail server properly.
Ø If you encounter a problem you would normally whitelist, search out the real problem and inform of the administrators of the domain with the problem about the issues.
Ø Ask the administrators with improperly setup e-mail servers and/or DNS servers to correct the problem on their end. There are several free and paid DNS testing tools available via searching the Internet which can assist you in troubleshooting those issues.
Ø Run REPORTS:
v Go into REPORTS è SPAM AND VIRUS REPORTS è GREYLISTING and set a date range to see how many e-mail servers never re-send because they are spammers.
v Reports can also be created on both a SERVER and DOMAIN LEVEL. You can also create custom reports and have them e-mailed on a regular schedule.
v Other reports are available as well. Experiment with what is already built into SmarterMail and see how well your server is doing and what resources your customers are using.
Once you have configured these settings, monitor your server for a while. You should see a huge improvement in the amount of spam you process immediately.
Will these settings completely eliminate spam? No. Even with these new antispam settings in place on your SmarterMail installation you may, occasionally, see some spam creep through and end up in user’s mail boxes.
You can help prevent this from happening by making certain you do not allow your users to override greylisting or spam settings. Doing so will both allow spam to start to come through again and will also cause you hours of support headaches and ill will with our customers and users.
Spammers make large amounts of money off the relatively small percentage of people who respond. In the case of identity theft, the result is often years of working to resolve unauthorized charges on credit cards, money stolen from bank accounts, and ruined credit. As SmarterMail operators we have an obligation to protect our users from all kinds of spam.
Even with these new antispam settings in place on your SmarterMail installation you may, occasionally, see some spam creep through and end up in user’s mail boxes. Using these settings provides no guarantee that you will not have any spam.
Much of what you are likely to encounter is joe-jobbing, for which very little can be done except to ride out the storm.
You may also encounter spam from spammers who have setup e-mail servers which meet all of the requirements set forth by the IETF and are not trapped by these filters.
You can help prevent this from happening by making certain you do not allow your users to override greylisting or spam settings. Doing so will both allow spam to start to come through again and will also cause you hours of support headaches and ill will with our customers and users.
Finally, and I cannot impress this frequently enough, make certain you enforce SECURE passwords. Secure passwords are at least eight [8] characters in length, and require a combination of UPPER and lower case letters, numbers, and special characters. This will eliminate insecure passwords; eliminate the possibility of your users from using the names of family members, pets, and friends; and will also eliminate words which are in the dictionary.
J: NEED HELP?
IT has changed significantly in the 40-plus years since IBM was kind enough to underwrite the classes I initially attended while in high school. It is no longer about plugging cables into boards on accounting machines or writing code with a 16K limitation on available memory. We no longer enter data via 80 column punched cards and read the results off of printed paper, and we don’t have to wait hours or days to see a result.
The best thing about working in IT is the fact that our field is constantly changing – and constantly challenging.
The SmartPhones we now carry around with us have more than 100,000 times the computing power of the computers sent up in the original Mercury and Gemini space programs and 10,000 times the computing power of early mainframes.
Even for an experienced IT tech: someone who has come up through the ranks, answered the calls on the help desk, can troubleshoot PCs, Macs and printers, in his or her sleep, giving tech support via a hands-free cell phone call while driving down a busy expressway; setting up an e-mail server, even an e-mail server with the reliability and integrity of SmarterMail, can be a daunting endeavor.
The devil is always in the detail! The detail required to properly setup modern IT has so many different aspects to it that locating something that is “not quite right” can completely disable the proper operation of many different aspects of a network but improper configurations are especially significant where e-mail is concerned.
A forgotten HOST entry, selecting the wrong IP address, forgetting to map an MX record to a HOST NAME, not mapping DNS to the DNS servers setup when a domain name was purchased, wrangling with DNS for e-mail and IIS when having to maintain the integrity of DNS for Active Directory, failing to setup IN-ARPA – all of these have a potential to disable any e-mail server’s ability to send and receive e-mail properly.
SmarterMail users are exceptionally fortunate to have an incredible community of users who participate in the forums provided at http://forums.smartertools.com/forumdisplay.php/14-SmarterMail.
If the forums cannot provide everything you need, then the SmarterTools Knowledge Base is available for further research at: http://portal.smartertools.com/KB/browse.aspx
Remember, SmarterMail gives two free support tickets with the purchase of each product. Those tickets can be used to open support cases with SmarterMail, and, if your trouble turns out to be a bug, the cost of the ticket is refunded back into your account. This is a HUGE benefit of using SmarterMail over some of the other products on the market.
Finally, if you are just setting up a new SmarterMail installation, you can always request support from one of the members of the forum. Simply click on the member’s screen name and select the option to send a private message.
Pingback: SmarterMail Setup Anti-Spam Tools and Tips | InteractiveWebs Blog | Spam Fighting Tools And Advice
Thank you for publishing my SmarterMail antispam settings document.
For an updated version, complete with clarifications and an entire new section on DMARC, please see:
http://www.ChicagoNetTech.com/docs/SmarterMail_Anti-Spam_Settings.pdf
It would also be nice to give credit to me as the original author of the document when you publish my work on your website!
Bruce Barnes
ChicagoNetTech Inc
If they are yours Bruce, then thanks. They are great. I was given them without your reference. Either way, I did not write them and found them terribly useful. Good job.
Nice! Stumbled across this when setting up Forced TLS for a client. Well dine Bruce and Interactive Webs for sharing this.
Please to help. As you realize the author should get the credit, but glad to be able to make it easy to find!
Thanks to Interactive Web for helping in the fight against spam and the adoption of TLS encryption!
Free quality information is where it’s at on the web!
I’m actually in the process of a major rewrite of the document to include both additional settings available in SmartetMail 11.0 and several important updates to RBL databases.
Some of the new issues are the cap on the number of queries which can. Be received from a single DNS server in a single 24 hour period, making the use of high speed, public DNS servers now impractical because the RBL test results fail and cause false positives.
The revised document will be provided via the Smartertools blog through a link back to my customer service portal at http://portal.chicagonettech.com.
Bruce Barnes
ChicagoNetTech
Thanks Bruce…. legend!